Howdy, Notion newbies! Welcome to Gridfiti’s Notion tutorial for beginners. I’m Mel Lee-Smith, freelance writer and Notion creator. I’m super excited to team up with Gridfiti to show you how to use this powerful platform. We’ve got a lot to cover, so buckle up!
Looking for more productivity tips and tools? Subscribe to The Flow — our quick, snappy, value-packed focus and recharge newsletter. Also, don’t miss our several other Notion template round-ups and guides!
Whether you’re creating a meal plan for 2 or a company wiki for 200, Notion provides the building blocks you need to create a workflow that works for you.
Notion is an online productivity platform that combines the functionality of spreadsheets, word processors, note-taking apps, task management solutions, and so much more.
You’ll notice some of Notion’s features are similar to those of apps you already know and love, like Evernote’s minimalist note-taking interface and Trello’s intuitive Kanban boards. But thanks to its database features, Notion is in a league of its own. No other program lets you store, organize, and view data in context like Notion. And we’re not saying that because we’re paid to — we’re speaking from experience!
You’re probably thinking, “That’s all well and good, but how in the heck do I use this thing?”
If you’re reading this, you’ve noticed that Notion has a somewhat steep learning curve. Luckily, you’ve got Gridfiti to guide you! Read on to learn all of Notion’s basic and advanced features, plus a few tips on how to create beautiful dashboards using third-party apps and extensions.
Is Notion free?
Notion is free, but it also offers 3 paid plans: Personal Pro, Team, and Enterprise.
The free version includes unlimited pages and blocks, integrations with other apps, up to 5 workspace guests, and a file upload limit of 5 MB per file. Compared to other productivity apps, Notion’s free plan is one of the most generous out there and will be sufficient for most casual users.
Sign up for Notion here, free for personal use, students, and educators.
Personal Pro Plan
Perfect for: entrepreneurs and content creators
Cost: $4/month if billed annually; $5/month if billed monthly
Features: Everything in Notion’s free plan, plus:
- Unlimited file uploads
- See up to 30 days’ worth of page revisions
- Priority support
Team Plan
Perfect for: small to medium-sized businesses
Cost: $8 per user, per month if billed annually; $10 per user, per month if billed monthly
Features: Everything in Personal Pro, plus:
- A collaborative workspace with advanced sharing and admin controls
- Unlimited workspace members
Enterprise Plan
Perfect for: large companies
Cost: Varies — contact Notion sales
Features: Everything in Team, plus:
- Unlimited revision history
- Advanced security controls
- Bulk PDF exports
- Secure sign-on
- Dedicated account manager
- Early access to new features
Workspace
Your Notion workspace is essentially your entire account. It houses all your pages and subpages (which we’ll cover in just a minute).
You can share your workspace with other Notion users. Within the sharing settings, you can choose whether other users are allowed to edit, share, or duplicate the page to their own workspace.
Sidebar
Your Notion sidebar is your navigation pane. This is where you’ll find:
- all your Notion workspaces (including any workspaces owned by others and shared with you)
- your account settings
- notifications and updates
- all the pages in your selected workspace
- pages you’ve favorited and shared
- a link to Notion’s official templates
- the option to import data from third-party platforms (like Evernote, Asana, etc.)
- pages you’ve deleted
- the option to add a new page
You can choose to show or hide the sidebar. If you hover over the two arrows in the top left-hand corner of your workspace, you can also preview your sidebar and access its contents without locking the sidebar open.
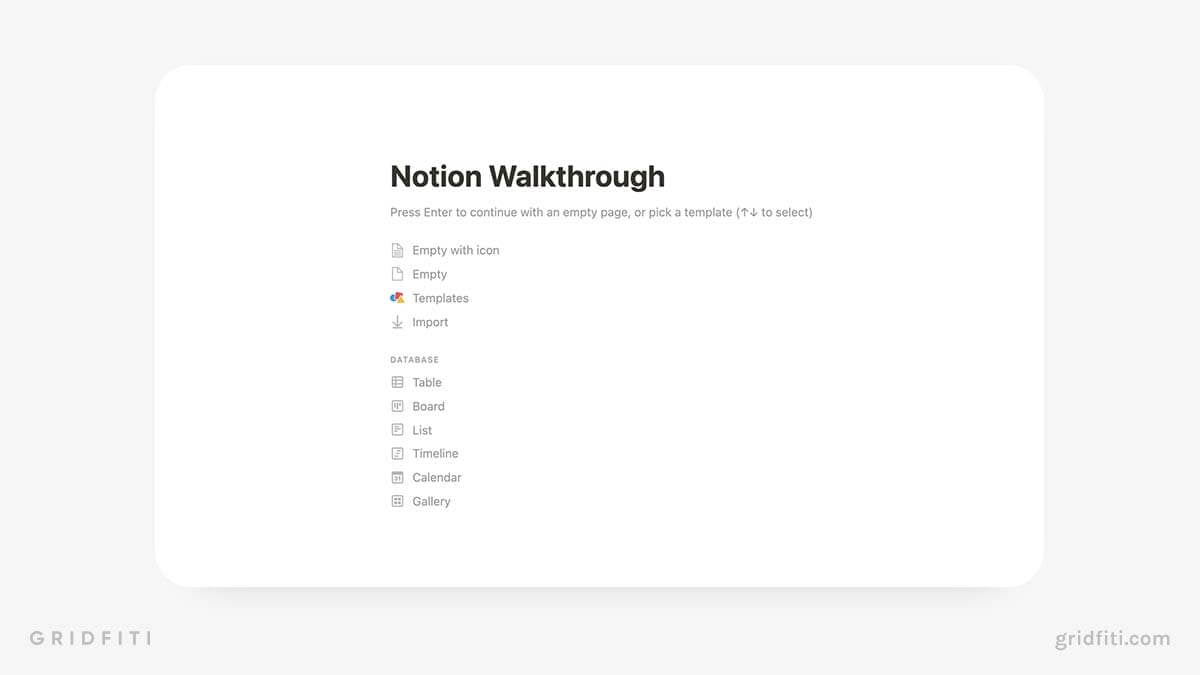
Pages
Pages are where your information lives in Notion. Pages are super versatile — they’re kinda like notebook pages and file folders combined. Not only can you use pages to store content (like a notebook), but you can also create multiple subpages within a page (like a file folder).
To make certain pages appear at the top of your Notion sidebar, click the 3-dot menu at the top right-hand corner of the page and click “Add to Favorites”. You can quickly add a link to any page in Notion by “mentioning” it. Just type “@“, then select the page you’d like to link to from the pop-up box.
You can also customize how your pages look, to an extent. You can choose between 3 fonts (Default, Serif, and Mono), set your pages to narrow or full width, and access your page history. You can also export your Notion pages in PDF, HTML, and Markdown formats.
There are a few things you can’t do with Pages. For example, you can’t change the background color or set custom fonts to your pages in Notion (at least, not without a third-party app or extension, which we’ve covered later in this post.) Additionally, if you’re on the free plan, you can’t restore previous versions of pages.
How do you make a page full-width in Notion?
When you create a new page (or subpage, for that matter), you’ll notice a significant amount of white space on the left and right side:
To get rid of this white space, select the 3 dots in the top right-hand corner of the page. In the menu, toggle on “Full width”:
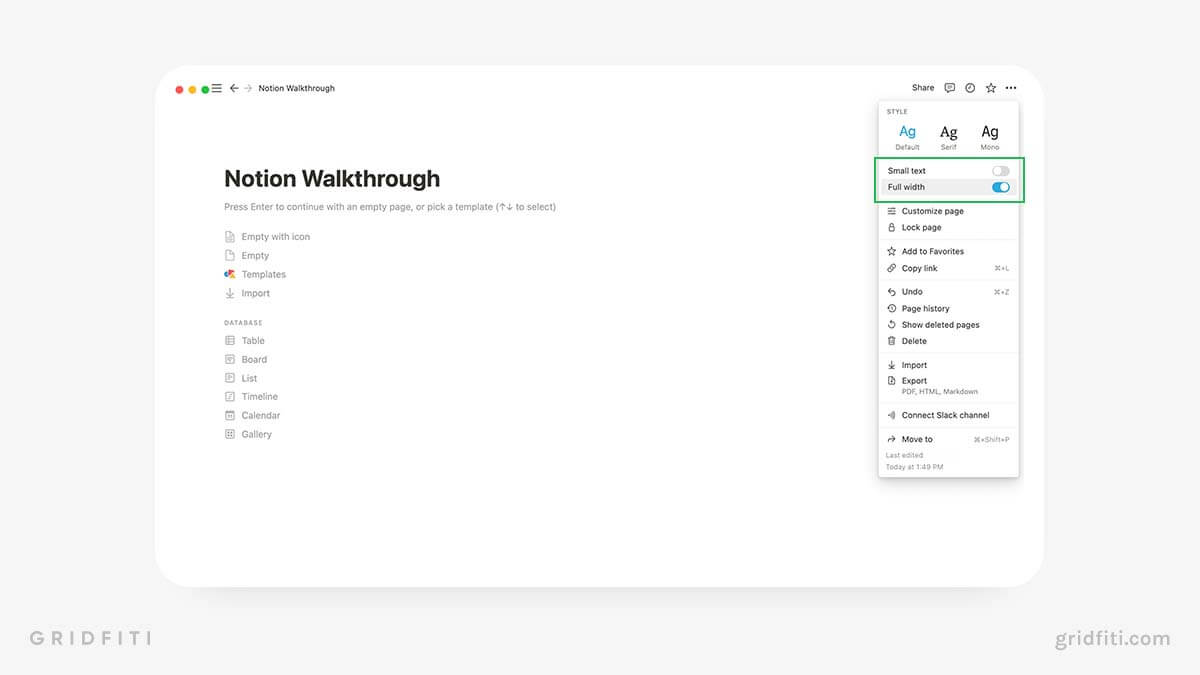
And voila! The page is now full width, giving you more room to add as many blocks and columns as you’d like!
Subpages
Notion pages are nestable, which means you can create new pages within another page. These are called subpages.
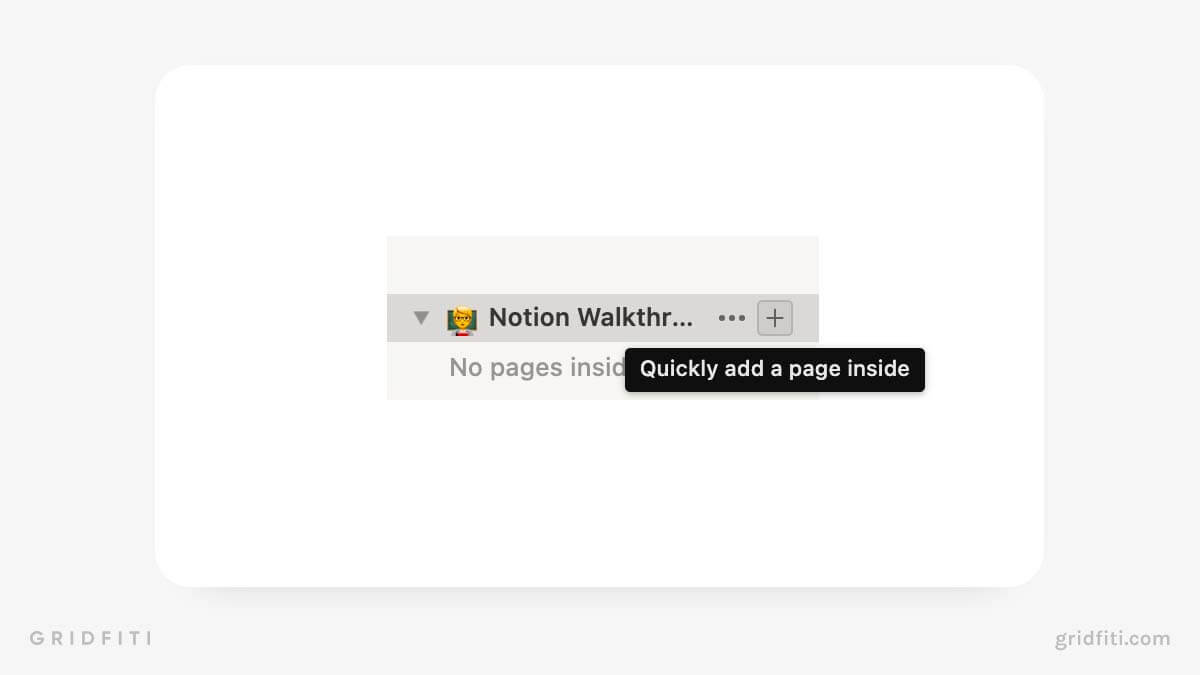
To illustrate, here are the subpages I’ve nested within my top-level “Hobbies” page:
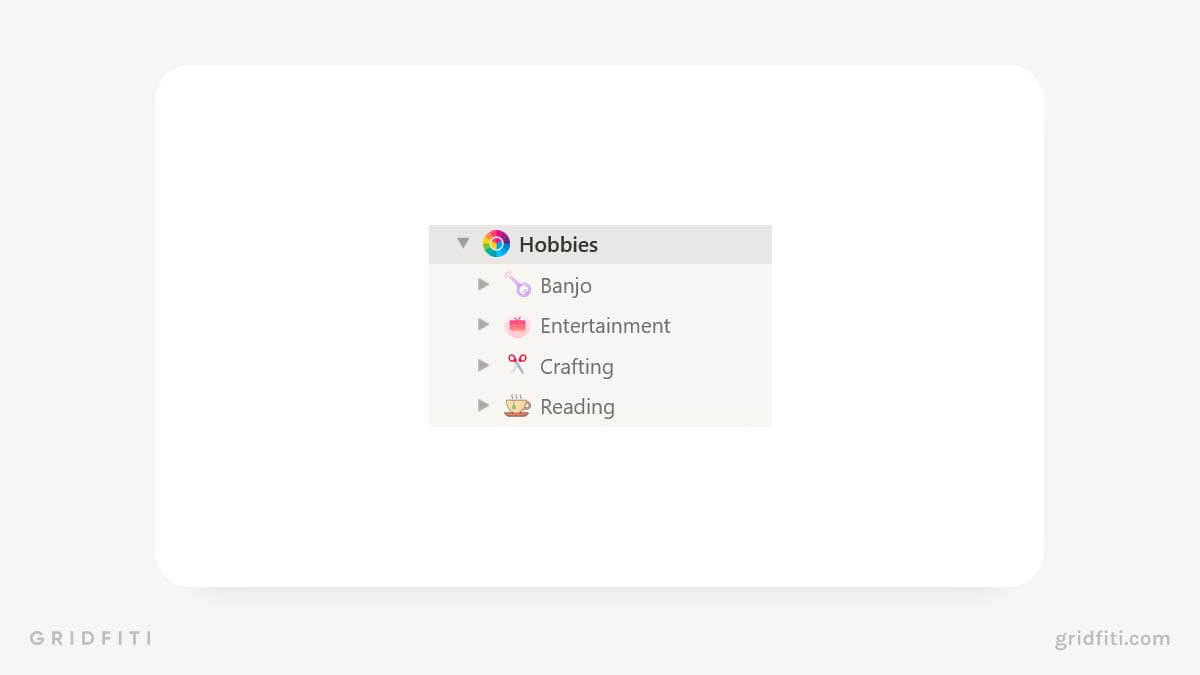
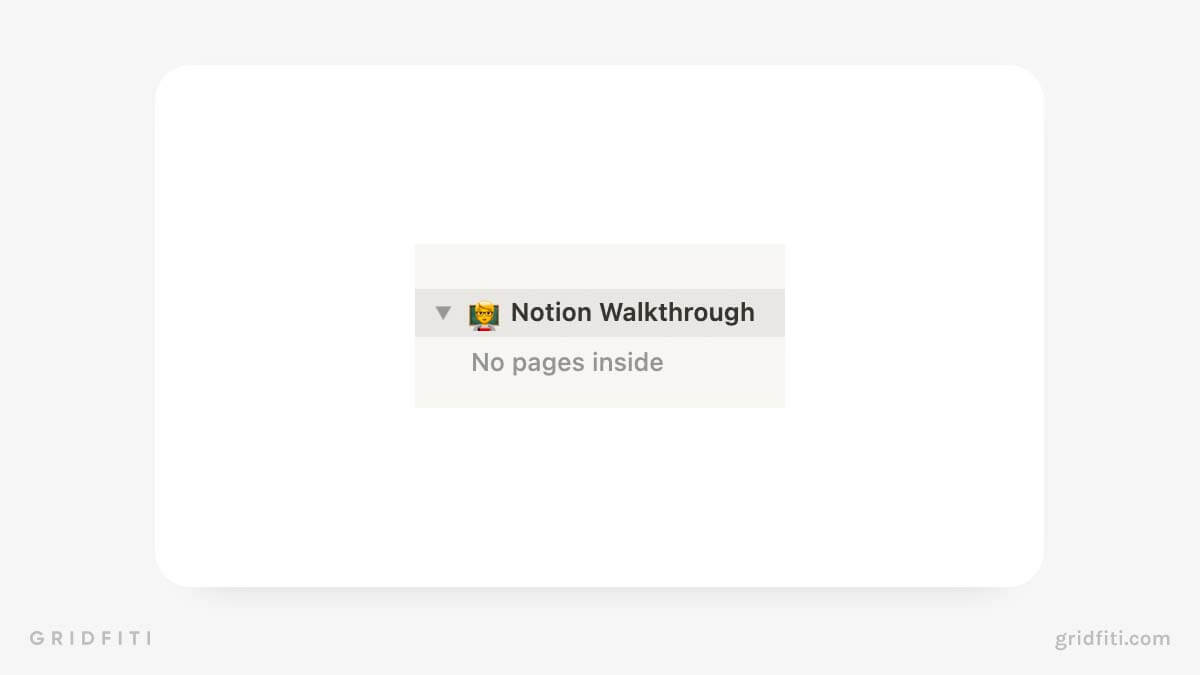
See that little triangle to the left of the page title? That’s a toggle. Click that to show or hide all the subpages within a top-level page. If there are no subpages, the message “No pages inside” will display:
You can create a new subpage using 5 different but equally effective methods. (Our personal fave is method #5.)
Method #1: In the sidebar, hover over the page where you’d like to add a subpage and click + to create it.
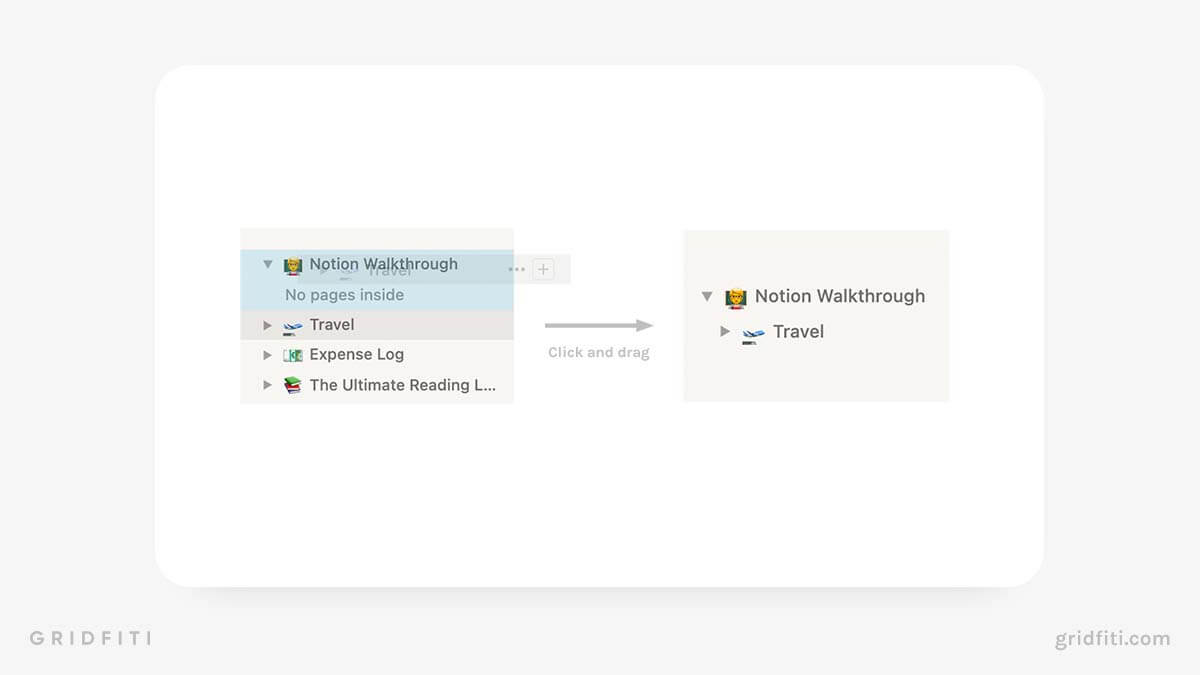
Method #2: In the sidebar, click and drag the page you’d like to nest within another page. Hover over the page until it’s highlighted in blue:
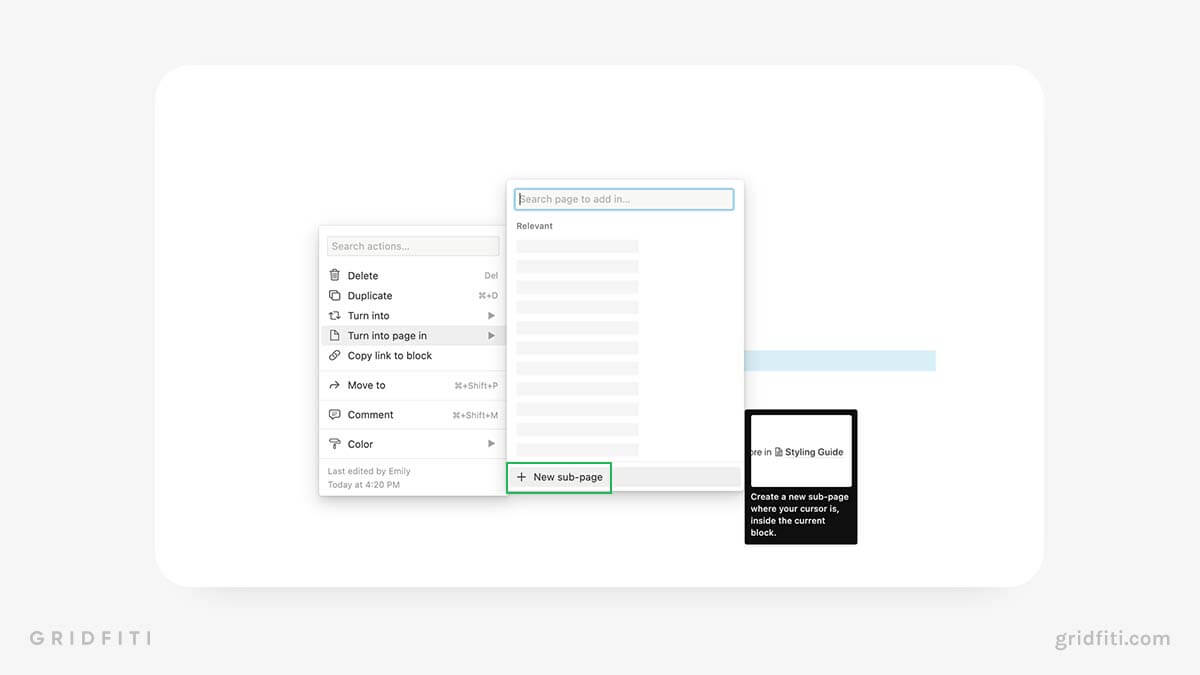
Method #3: Open the page you’d like to create a subpage within. Click inside the page and type the name of the new subpage as normal text. Hover to the left of your text to access the menu:
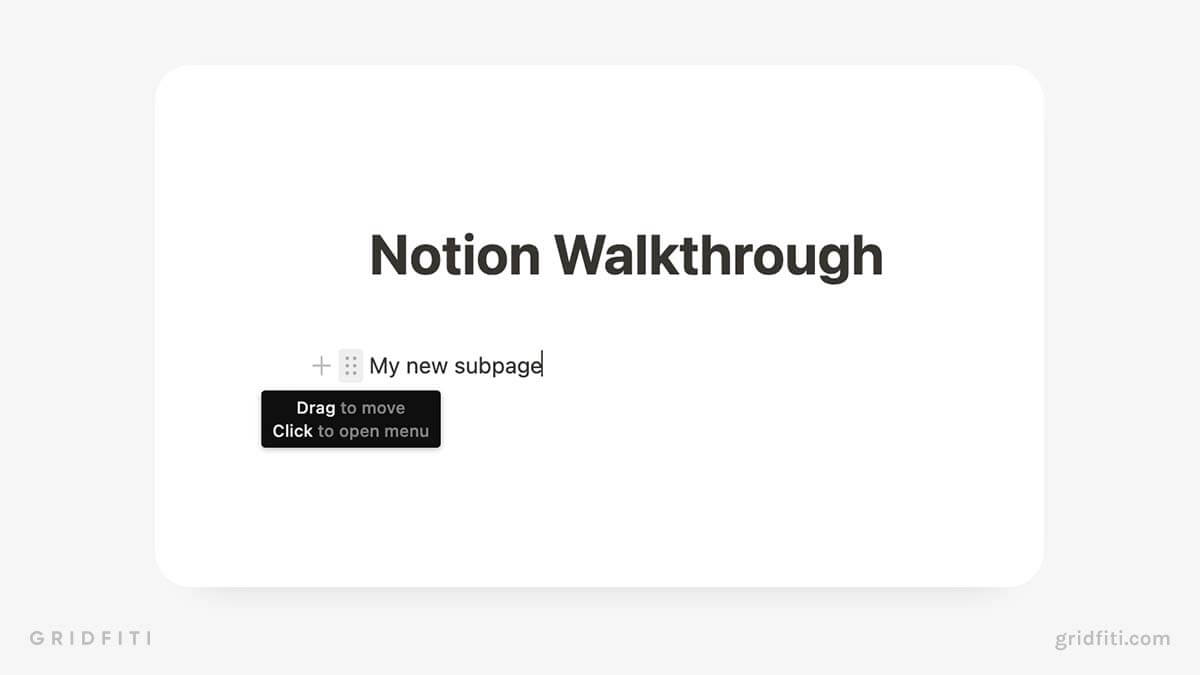
Click the the block handle (⋮⋮) to open the menu, then hover over “Turn into page in” > “New sub-page”
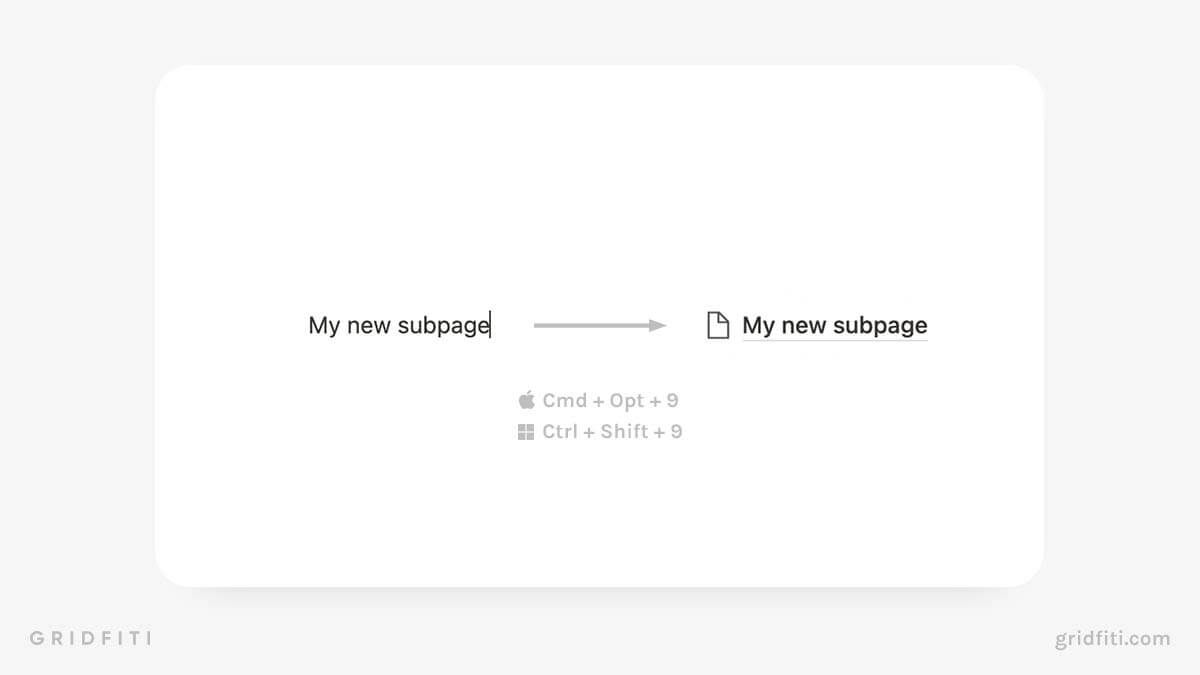
Method #4: Open the page you’d like to create a subpage within. Use the keyboard shortcut Cmd ⌘ + Opt ⌥ + 9 (macOS) or Ctrl + Shift + 9 (Windows) to create it.
Blocks
Blocks are the content within your Notion pages. Notion offers a wide range of blocks, from plain text and headings, to embedded videos and PDFs.
To change the order of blocks in Notion, hover to the left of the block and click the block handle (⋮⋮). Hold and drag the block up or down to move it. Or, hold and drag it to the left or right of another block to create a column!
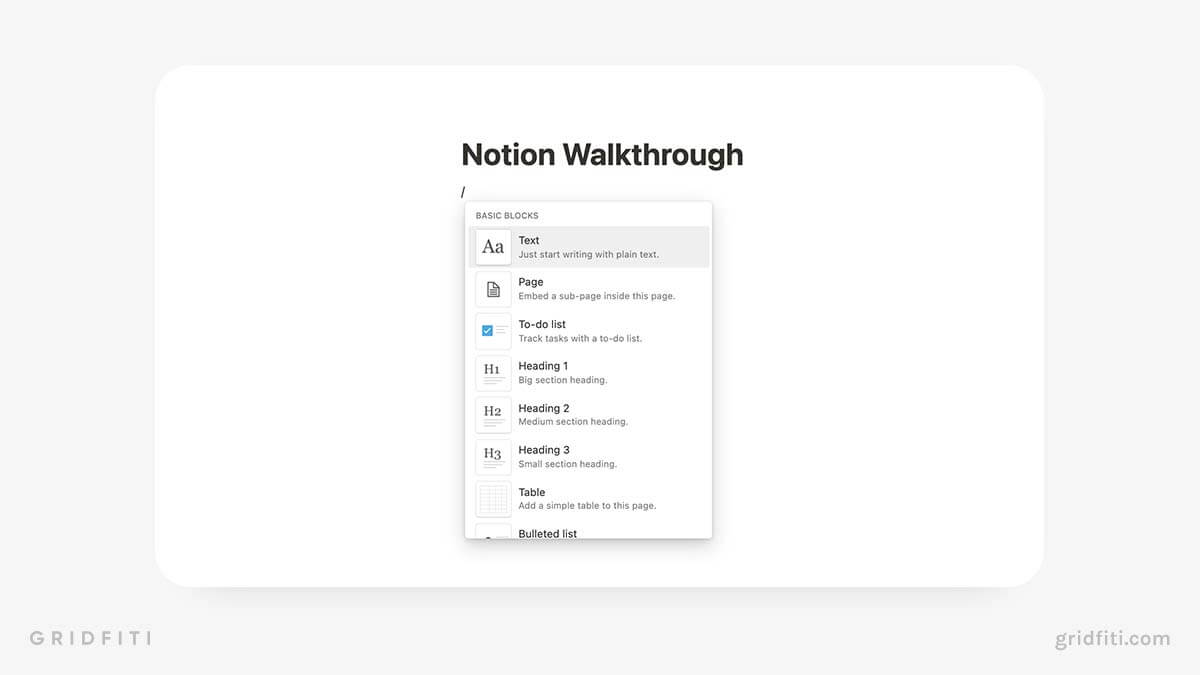
To see what blocks are available in Notion, simply create a new page, click inside it, and press the slash key [/] on your keyboard to open up the block menu:
Synced blocks
Synced blocks let you add the same block to multiple pages. Whatever changes you make to a synced block in one page will appear in any other pages where the synced block is displayed.
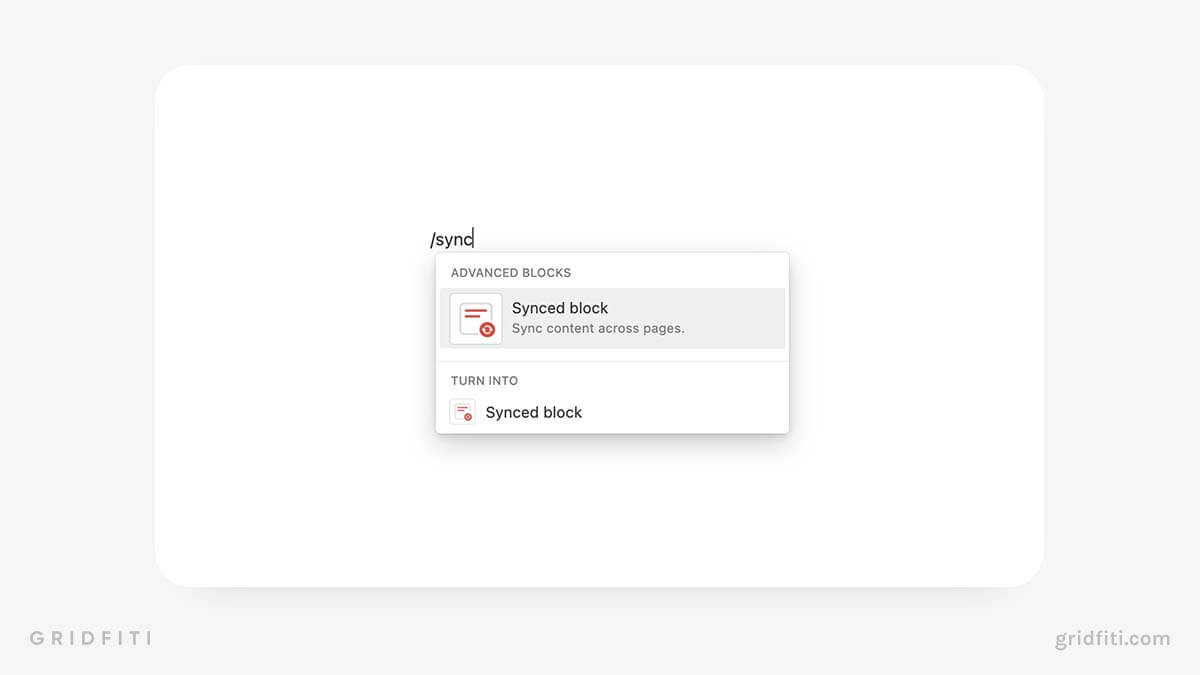
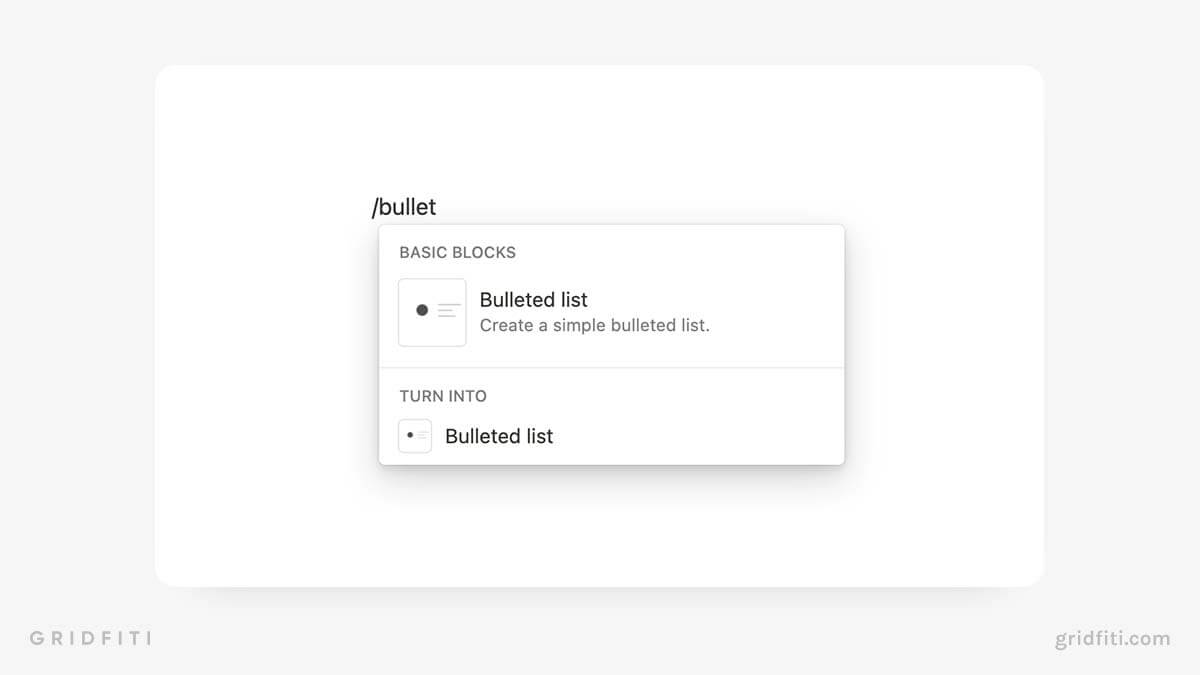
There are a couple of ways to create a synced block. The first method is to type “/” on your keyboard to open up Notion slash commands. Then, type “synced” and select “Synced block” from the menu:
The other way to create a synced block is to copy a block from one Notion page and paste it into another. When you do that, you’ll see this option:
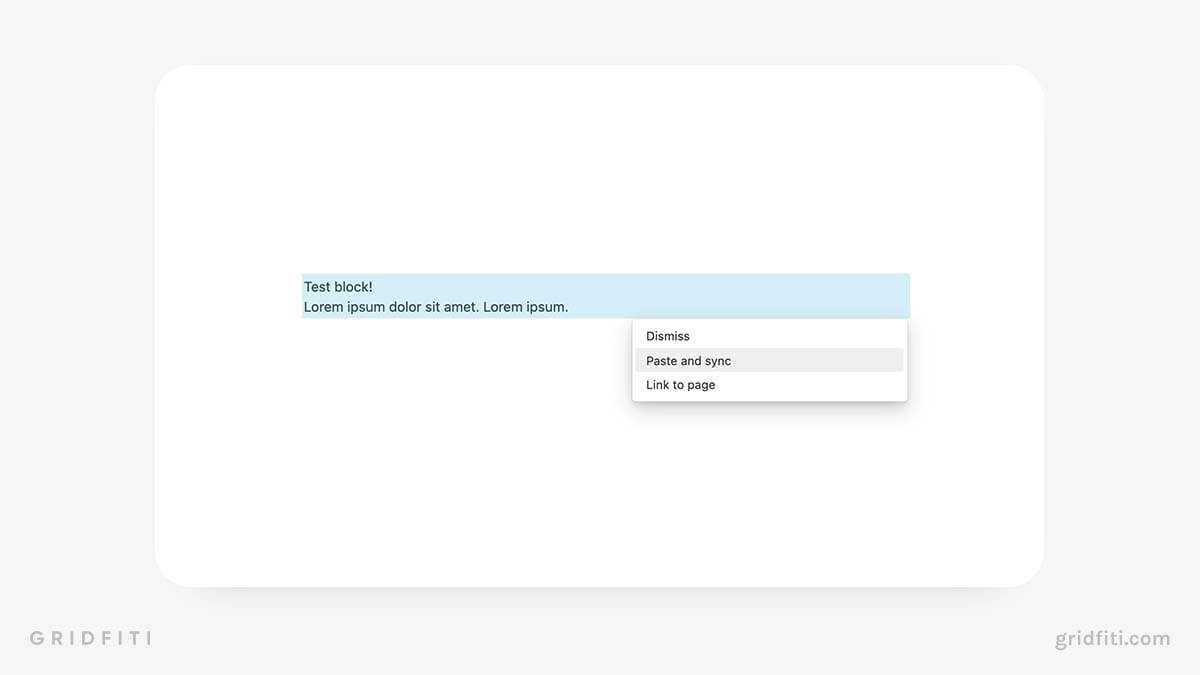
Note: If you’re creating a synced text block, make sure to copy the block itself (and not just the text) by selecting the block handle (⋮⋮) menu to the left of the block.
Notion templates
In the wonderful world of Notion, the word “template” refers to 2 separate things: page templates and database templates. What’s the difference?
Page templates are Notion pages and subpages created, designed, and shared by individuals. You can duplicate these templates to your own workspace. Nine times out of 10, when you see someone talking about “Notion templates” online, they’re referring to page templates.
To see some examples, check out these Notion templates for work, school, home, and everything in between:
- Blog Post: Aesthetic Notion Templates
- Blog Post: Free Notion Templates
- Gridfiti Notion Templates
- More Notion Template Round-Ups
Database templates apply to databases only. They allow you to create new pages within a database with properties already filled out and page content already added. This way, you won’t have to input the same information manually over and over.
Still confused? Let’s use my social media template bundle to illustrate:
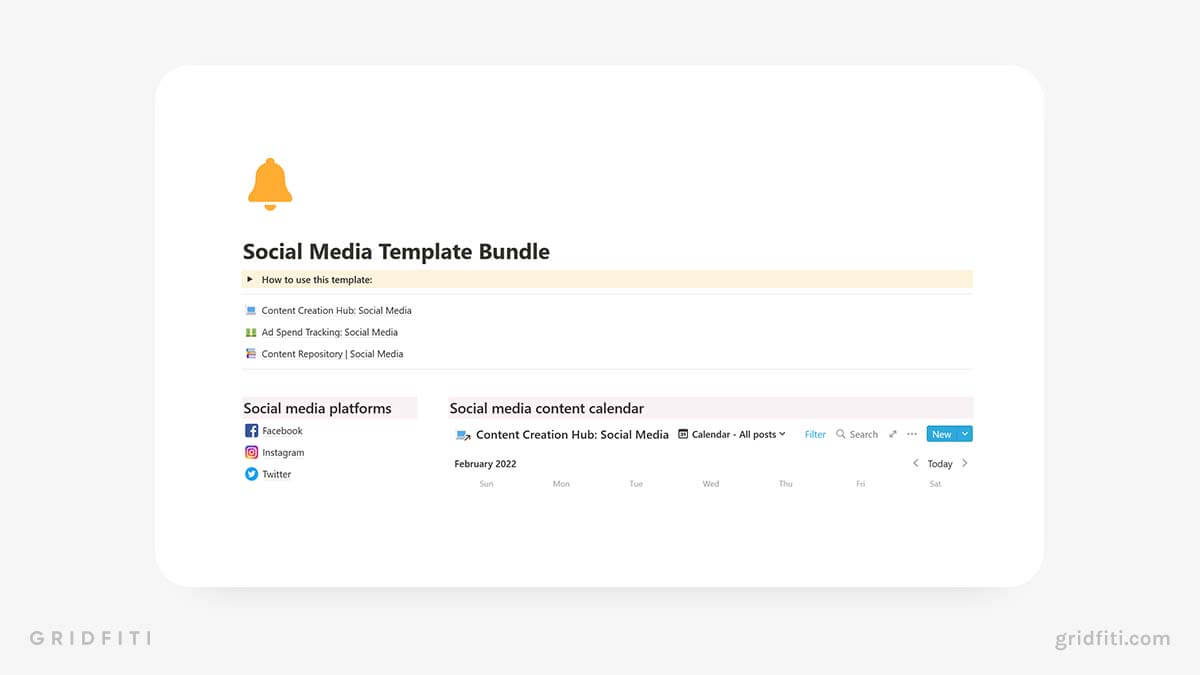
Even though it contains multiple pages and databases, the social media dashboard you see above could be called a single template since the whole thing can be duplicated to another workspace.
Within the social media dashboard is the Content Creation Hub database — where all social media content is stored. The Content Creation Hub features 5 database templates for Facebook, Instagram, Twitter, LinkedIn, and Pinterest content:
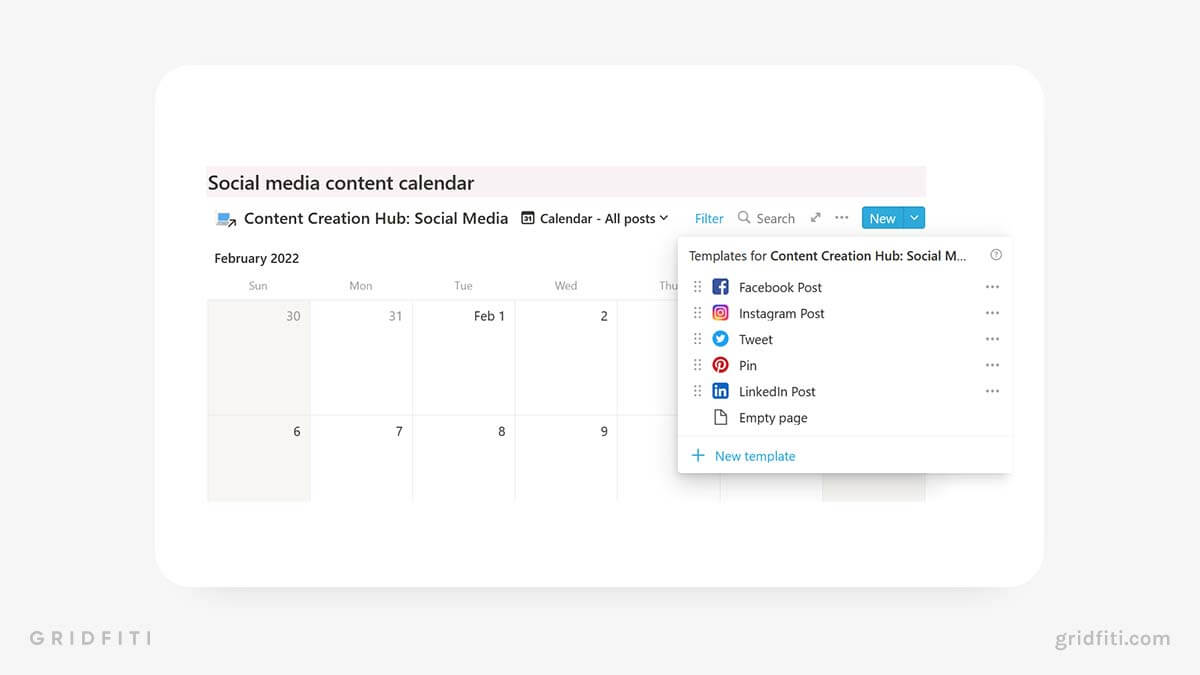
If you click the “Facebook post” template, Notion will create a new page, automatically add the Facebook page icon, and set “Platform” to “Facebook” and “Content Type” to “Social media”:
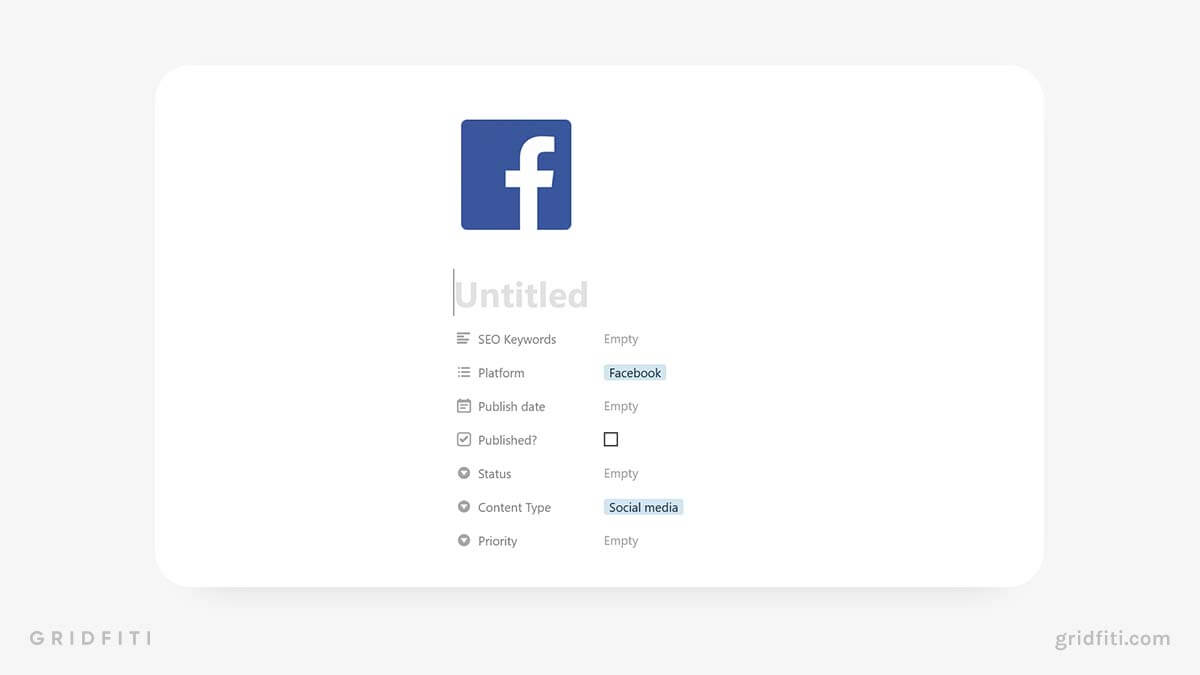
So whenever you want to create a new Facebook post in Notion, you don’t have to manually click into the Platform property to select “Facebook” or the Content Type property to select “Social media”. That would get old fast!
In addition to setting properties in a template, you can also add blocks within the page, below the properties. Here’s an example from my own blog post template:
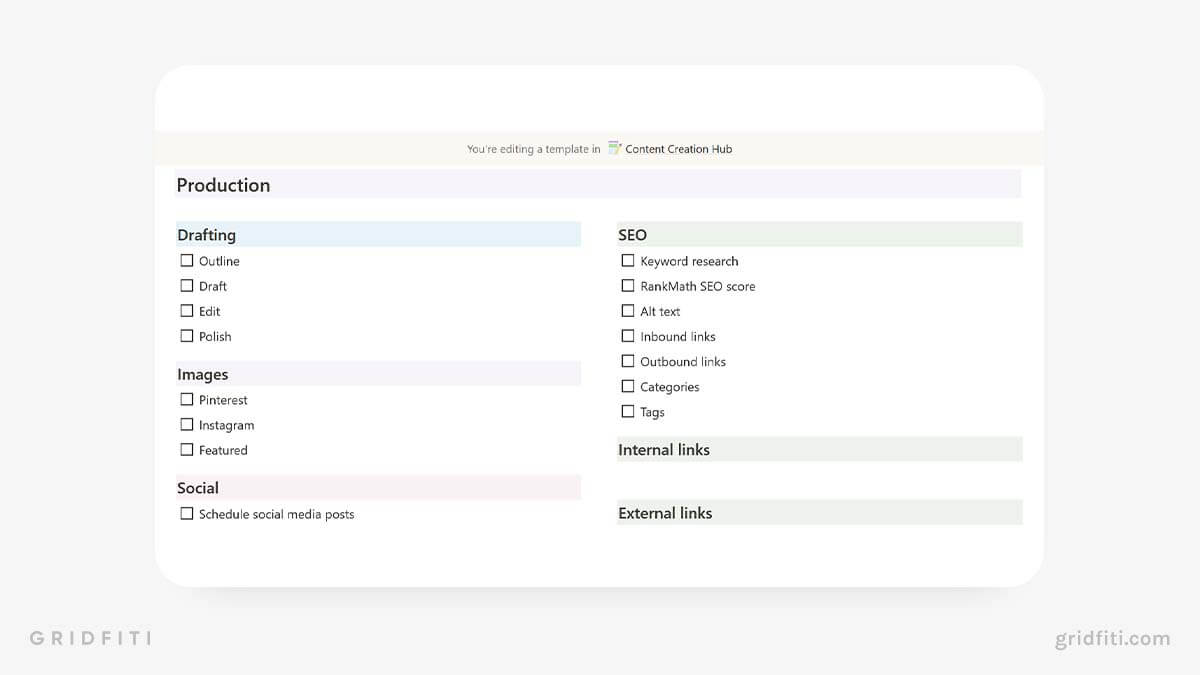
If you were to create a new page from this blog post template, all the checkboxes and headings you see here would populate automatically. No copying and pasting, and no wasted keystrokes!
Databases
Databases are like spreadsheets on steroids. They let you store large amounts of information that you can isolate or view in different contexts, all within a minimalist and visually appealing interface.
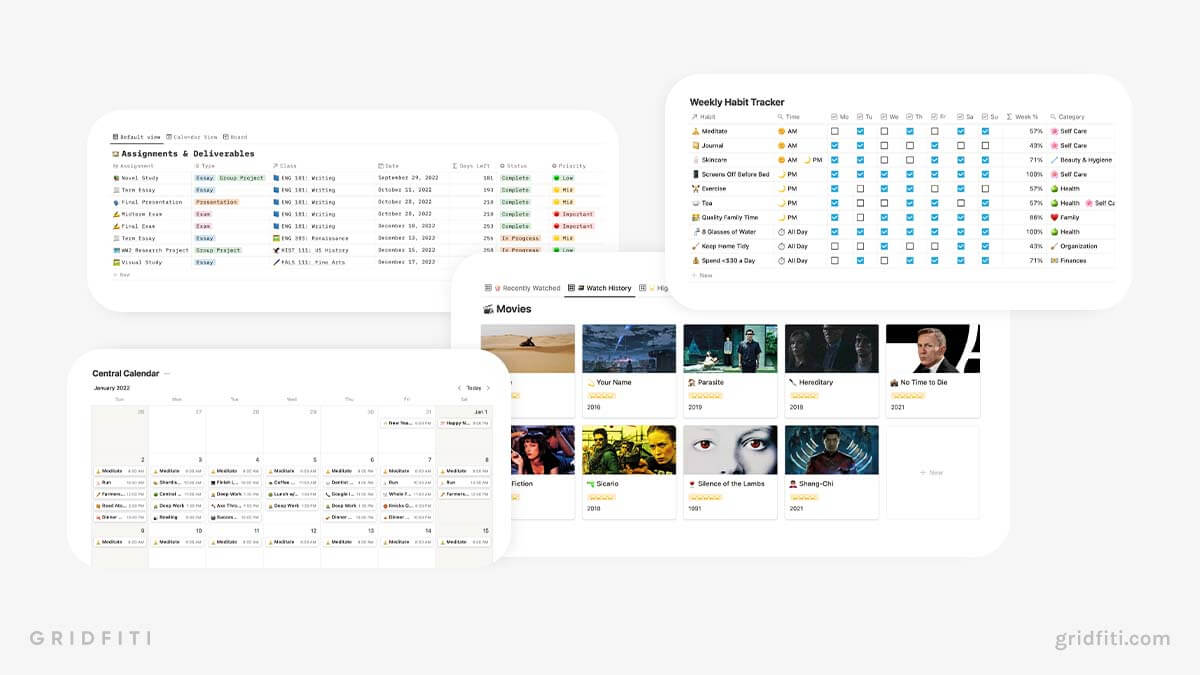
Databases are one of Notion’s most robust features. They’re so comprehensive that we dedicated the next section to database lingo.
How do Notion databases work in practice? Let’s say you’re creating a content calendar in Notion. You want to store all your blog, social media, podcast, YouTube, and email content in one place. But you also want to be able to see just your blog posts, or just your Instagram content. Or maybe you only want to see content that’s publishing this week. Or posts that you haven’t started yet. Databases let you do all that and so much more, without all the clutter and confusion!
When it comes to Notion databases, the possibilities are truly endless. Here are some popular use cases for Notion databases:
- class schedule
- content calendar
- address book
- resource library
- task manager
Not sure whether to create a page, block, or database for something you want to store in Notion? Ask yourself this: Would I normally create a spreadsheet or Kanban board (think Trello) to organize this information? If the answer is yes, go with a database.
Inline vs. full-page databases
When it comes to creating databases in Notion, you have 2 options: create an inline database or a full-page database.
What’s the difference? In a full-page database, you can’t add new blocks above or below your database. That’s pretty much it.
It doesn’t matter which one you choose. (I prefer inline, because I like to add blocks above and below my databases.) Plus, you can open an inline database as a full page by clicking the little arrow in the top right-hand corner of your database:
We recommend experimenting with both full-page and inline databases to discover which you like better. Using the linked database block, you can display a database anywhere in Notion, so don’t sweat it too much!
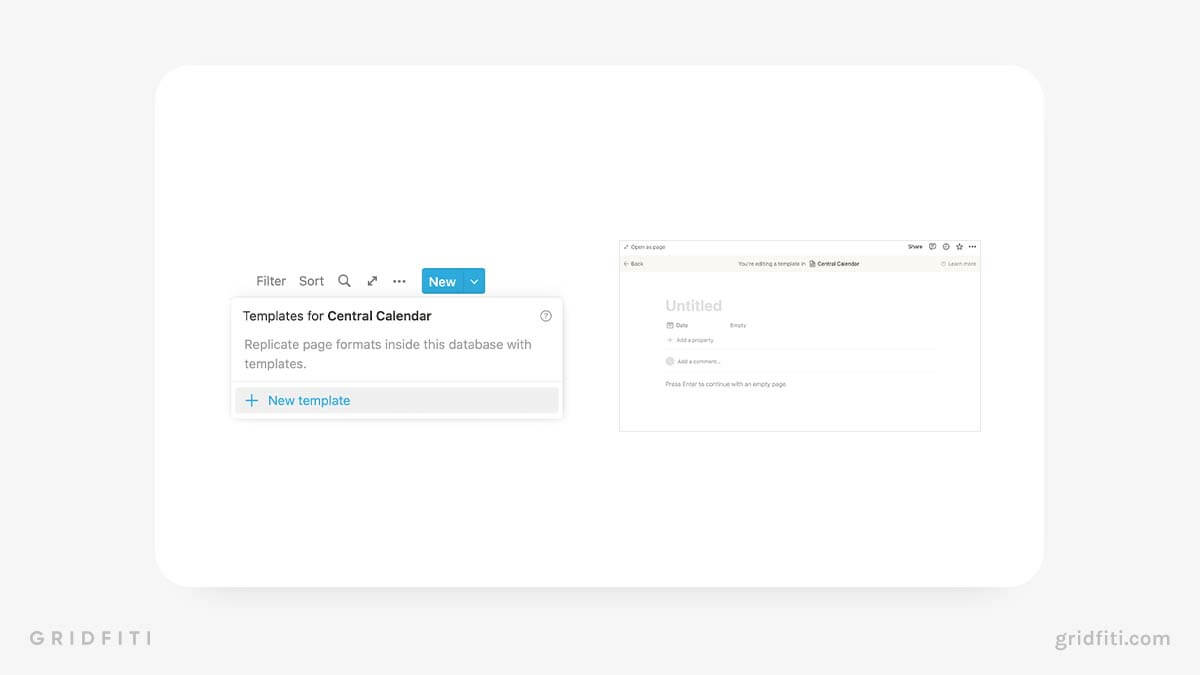
How to create a database template in Notion
(Earlier in this article, we clarified the difference between page templates and database templates. If you need a refresher, click here to jump back up to that section.)
- In the upper right-hand corner of your database, click the drop-down arrow next to “New”.
- Click “New template” at the bottom of the menu.
- A new page will open with a yellow ribbon at the top that reads: “You’re editing a template in [database name]”
- Update the database properties and add blocks within the page as you see fit.
How to edit a database template in Notion
- In the upper right-hand corner of your database, click the drop-down arrow next to “New”.
- Click “New template” to create a blank new template.
- To edit a template, click the 3-dot menu to the right of the template you’d like to edit, then select “Edit”.
How to duplicate a database template in Notion
- In the upper right-hand corner of your database, click the drop-down arrow next to “New”.
- Click the 3-dot menu to the right of the template you’d like to duplicate, then select “Duplicate”.
- This will create a copy of your template. You can edit and rename the duplicated template by clicking the 3-dot menu next to the name of the new template and selecting “Edit”.
Database lingo
Properties
What are Notion properties? They’re the building blocks of your database. These custom fields let you add additional info and context to the content you store in Notion. Properties also make it possible to create database filters, which allow you to include or exclude pages based on the criteria you set. (We’ll talk more about filters later.)
Properties are available only for Notion databases. If you create a new page in Notion without adding an inline or full-page database, you won’t be able to add properties.
A quick note on Notion’s “Title” property
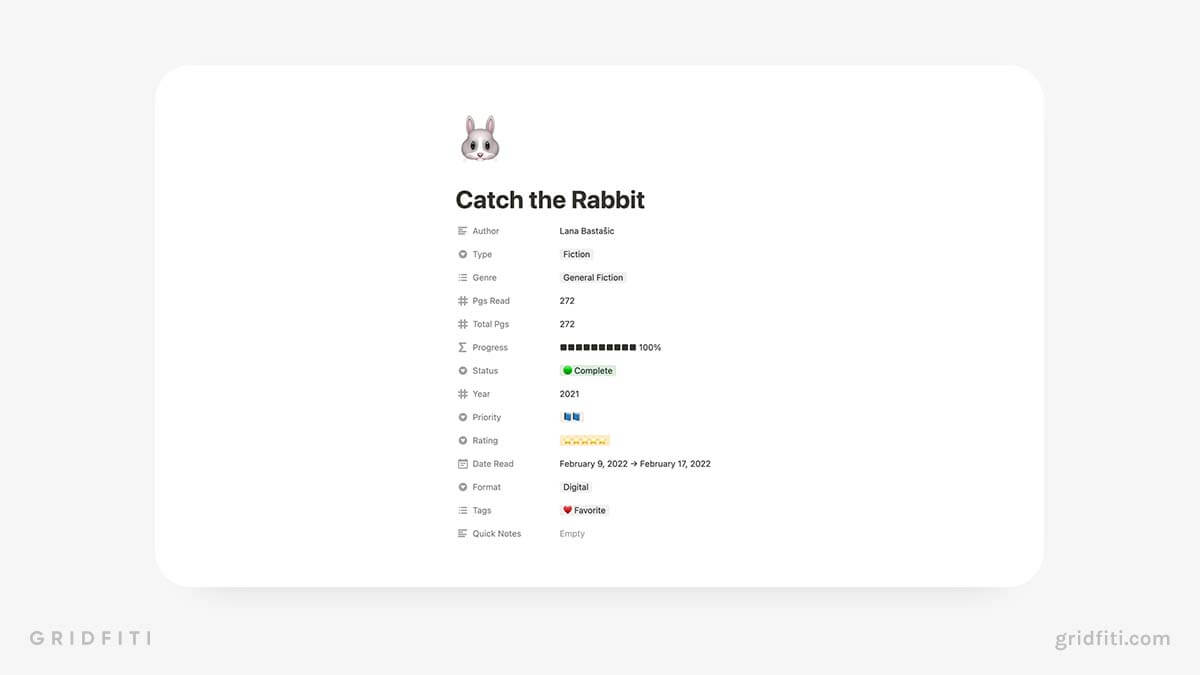
Before we take a deeper dive into Notion database properties, let’s talk about the Title property. This Notion property is the page title. When you create a new page within a database and give it a title, that title will appear in the Title property.
This property can’t be deleted or toggled off in database views. You also can’t change the property type like you can with other properties. Essentially, the only thing you can do to the Title property is rename it.
In addition to the Title property, Notion currently offers 11 Basic properties and 7 Advanced properties.
Basic properties in Notion
Notion’s Basic database properties are fairly self-explanatory. But since you’re new to Notion, we’ll go over how each Basic property works.
- Text: Lets you input text.
- Number: Lets you input whole numbers, monetary amounts, percentages, and more using the “Format number” option.
- Select: Lets you add a single custom tag to a page in a database.
- Multi-select: Lets you add multiple custom tags to a page in a database.
- Date: Lets you add a date or date range. You can also add start and end times and customize the date format and timezone.
- Person: Lets you assign a page in a database to yourself or another user in Notion.
- Files & media: Lets you add an attachment to a page in a database.
- Checkbox: Lets you mark an item as checked or unchecked.
- URL: Lets you link to a webpage.
- Email: Lets you input an email address.
- Phone: Lets you input a phone number.
Advanced properties in Notion
Just because these properties are “advanced” doesn’t mean you should shy away from using them! The Advanced properties are what make Notion one of the best productivity apps on the market.
There are 7 Advanced properties, but we’re going to focus on the big 3: Formulas, Relations, and Rollups. The other 4 — Created time, Created by, Last edited time, and Last edited by — are automatically updated by Notion, so you won’t be able to edit them.
Formula
From simple addition to complicated equations, formulas let you make just about any calculation your little heart desires! Notion’s formulas are just as diverse (and complex) as the formulas you might use in Excel or Google Sheets.
You can use formulas to calculate values from different properties in your database, or display an outcome based on your input in other cells using “if” statements.
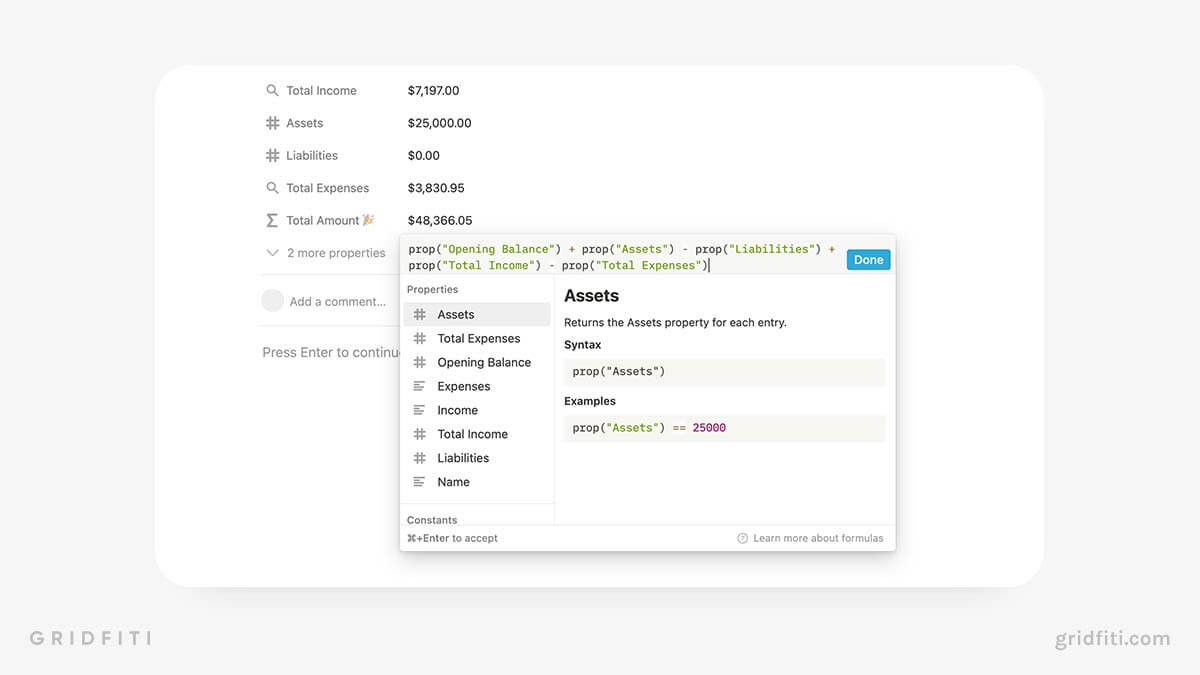
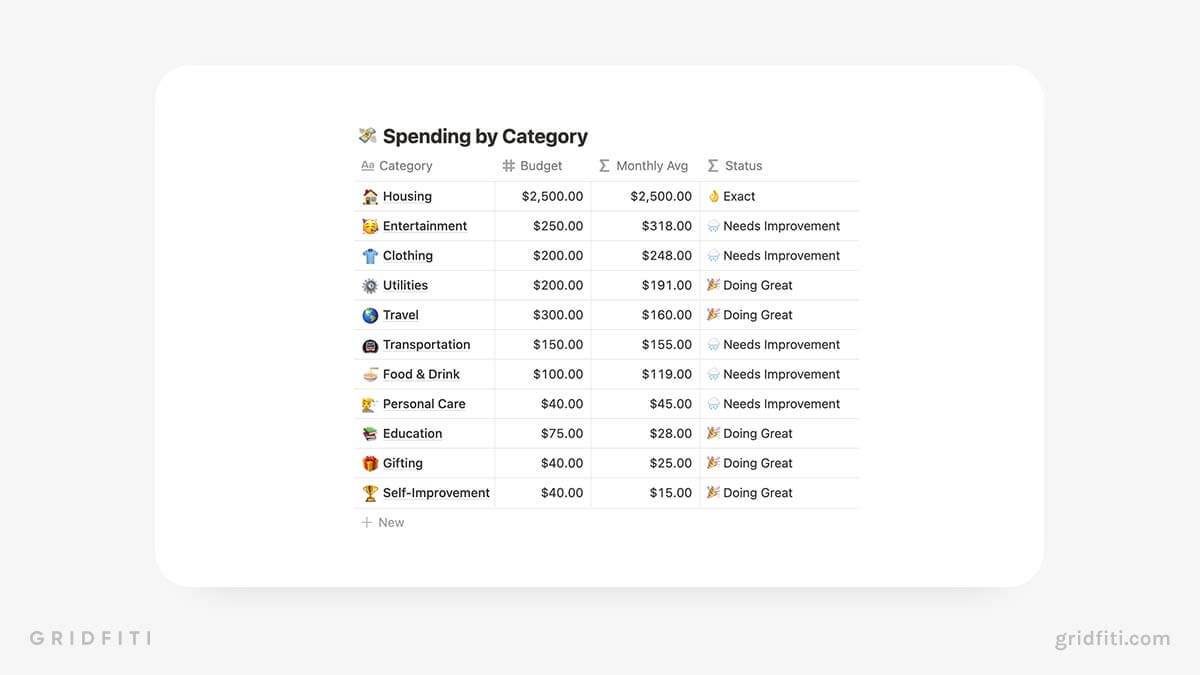
Check out this example from our Personal Finance Dashboard Notion template. We’ve set up our “Status” column to show users how close they are to achieving their financial goals. This is how it looks in the table:
And here’s a snapshot of the formula itself:
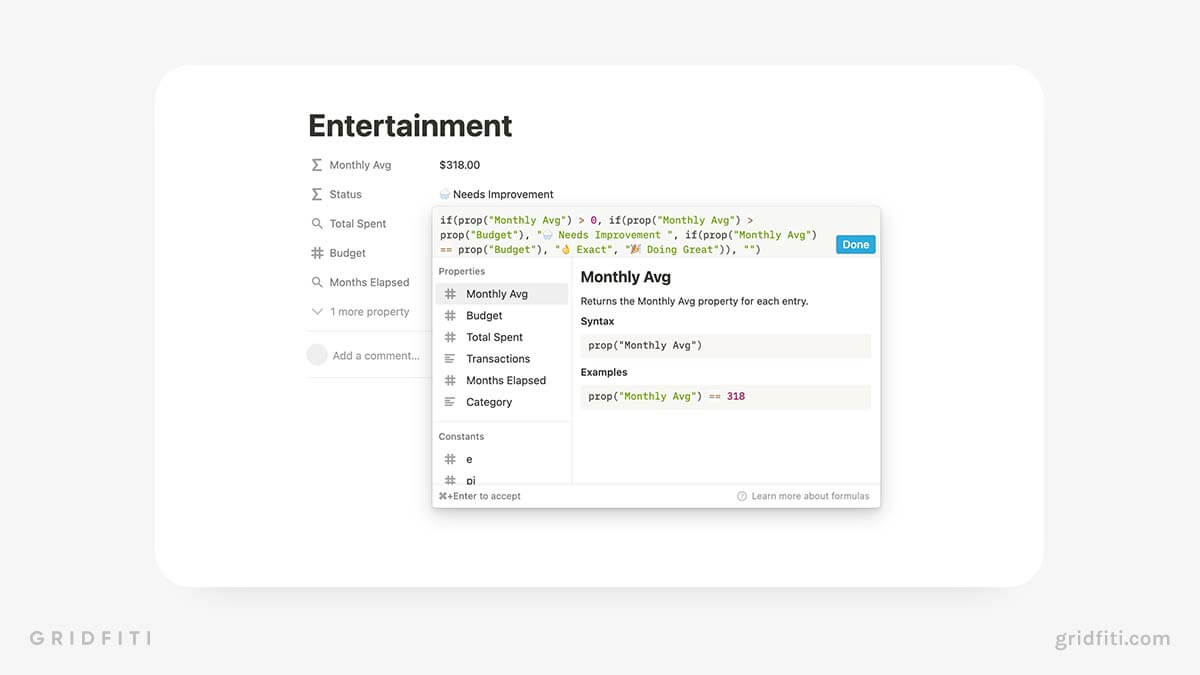
This formula example is definitely more advanced for any beginner, so don’t fret if it looks daunting off the bat! Essentially, this formula tells what Status to produce – depending on if Budget is either greater than, equal, or less than the Monthly Average spend.
You can create and customize new calculations using 4 basic “ingredients”:
- Properties: Your database properties.
- Constants: Fixed values (like pi)
- Operators: Relatively simple calculations. Includes basic math and basic logic.
- Functions: Relatively complex calculations. Includes time calculations, algebra, and more.
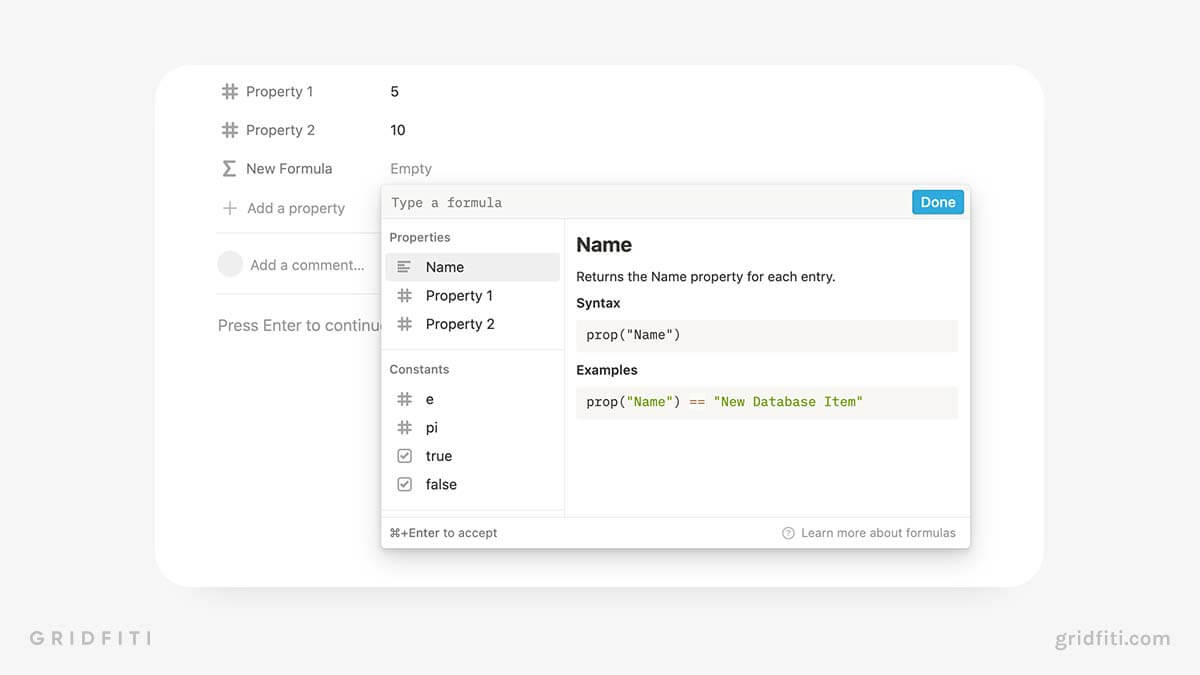
Mix and match these ingredients to create your formulas. When you create or edit a formula, a pop-up box will appear showing you all your database properties and formula functions:
Hover over each option to learn how it works. To the left of each option, you’ll see an icon that indicates which properties it works with. For example, the dateBetween formula works with Date properties.
Pro formula tip from someone with the mathematical aptitude of a second grader: if there’s an advanced calculation you need, chances are someone has already created and shared it. And chances are that someone is Ben Smith, pro Notioneer and mod of the r/Notion community on Reddit. Check out Ben’s formulas and examples here.
Relation
The Relation property (with the ↗ icon) lets you link pages from 2 separate databases. You can also relate a database to itself to link multiple pages within the same database. Why would you want to do that? To keep all your information connected, centralized, and easily accessible.
Relations ensure all the information you need is connected and easily accessible. The best way to wrap your head around how Relations work is to see them applied in real life.
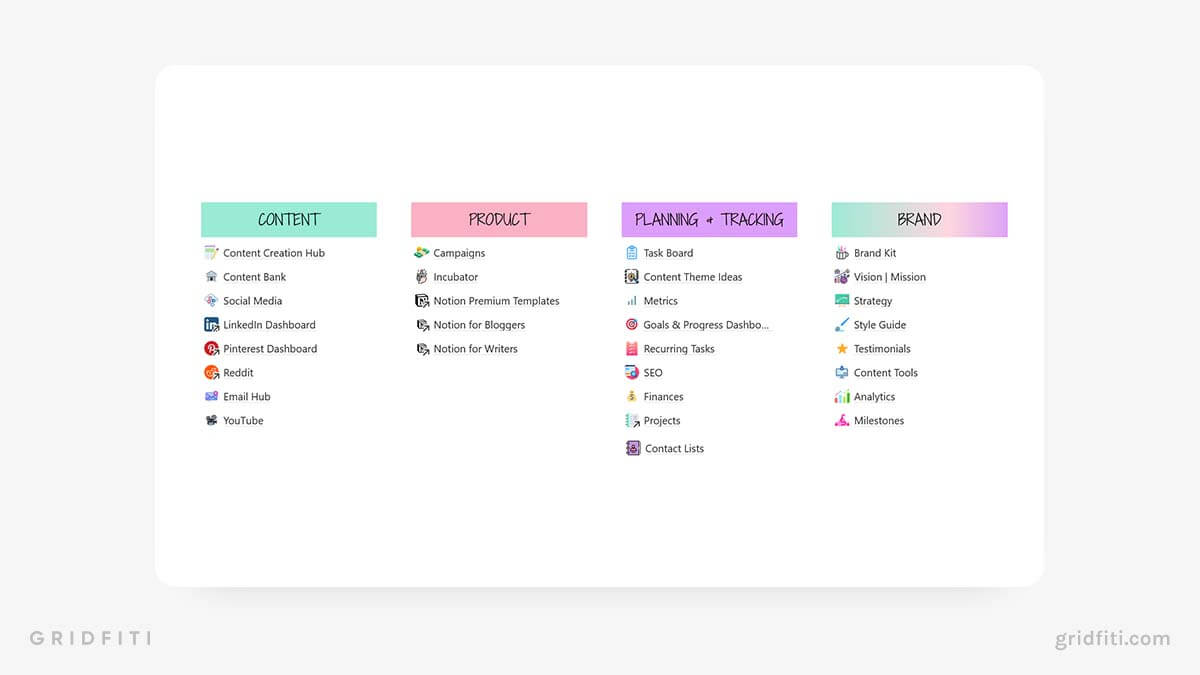
Here’s an example of how I use Notion’s Relation property to manage my freelance content marketing business. I’ve got 3 main databases that are linked with Relation properties:
- Content Creation Hub: This is where all my blog, social media, email, and YouTube content lives.
- Campaigns: This is where I store all my active campaigns, including my Notion blog templates and Notion templates for creative writers.
- Editorial Tasks: This is where I manage all my tasks.
This lets me link campaigns, content, and tasks together so I can see them no matter which database I’m using:
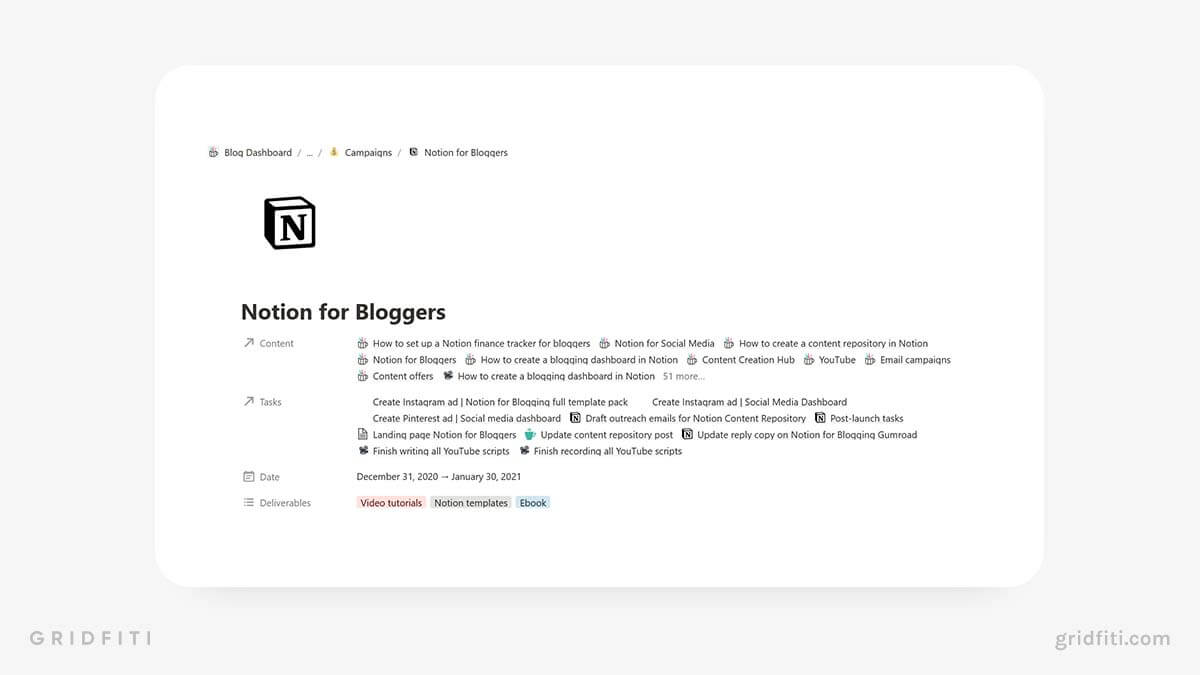
This screenshot shows my campaign page for my Notion blog templates. Thanks to the relations, I can also see all the tasks and content connected to the campaign. If I were to jump over to my content database, I could still see the tasks and campaigns linked with an individual content piece.
Rollup
The Rollup property lets you do 2 things. You can make calculations using data from 2 related databases. Or, you can display data from one database in another. We’ll show you an example of each. No matter how you use Rollups, this property requires at least one Relation property to work.
Using Rollups to make calculations using data from 2 related databases
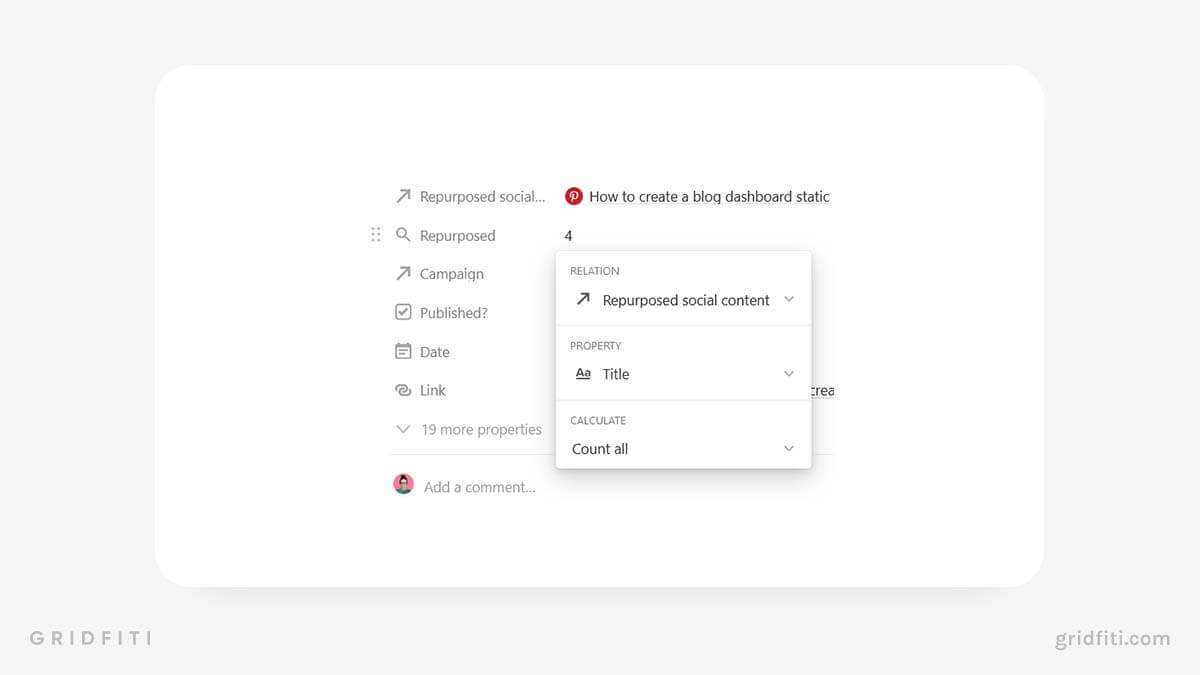
Rollups are probably one of the hardest Notion functions for newbies to understand. To illustrate how it’s used in practice, I’ll show you how I use a Rollup property in my Content Creation Hub database to count how many social media posts I’ve repurposed from each blog post.
First, I created a Relation property and related my Content Creation Hub database to itself. (I store all my blog, social, YouTube, and email content in the Content Creation Hub.)
Because I chose “one-way” sync, this Relation actually becomes 2 Relation properties since the database is related to itself. I titled one relation “Blog post” and the other “Repurposed social content”. Now I’m able to see which social media posts are connected to each blog post:
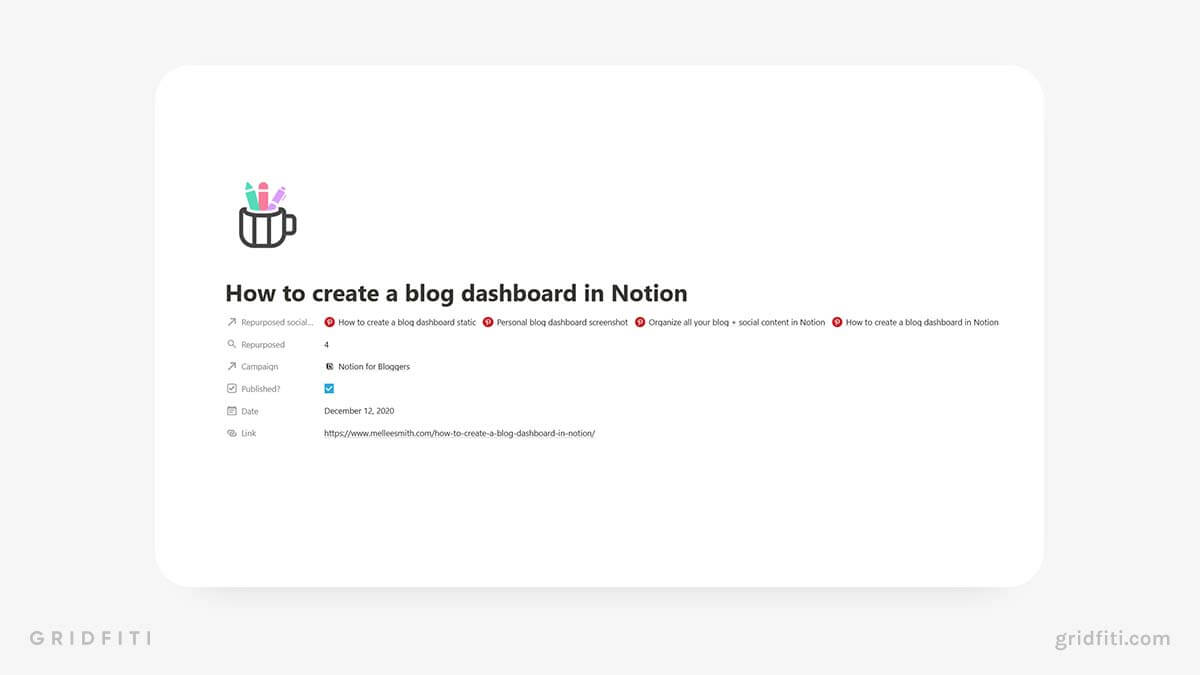
In the screenshot above, you can see that 4 pins are linked to my blog post, How to Create a Blog Dashboard in Notion. Just under that, the “Repurposed” rollup property counts those 4 posts. Here’s how I’ve configured the rollup:
Using Rollups to display data from one related database in another
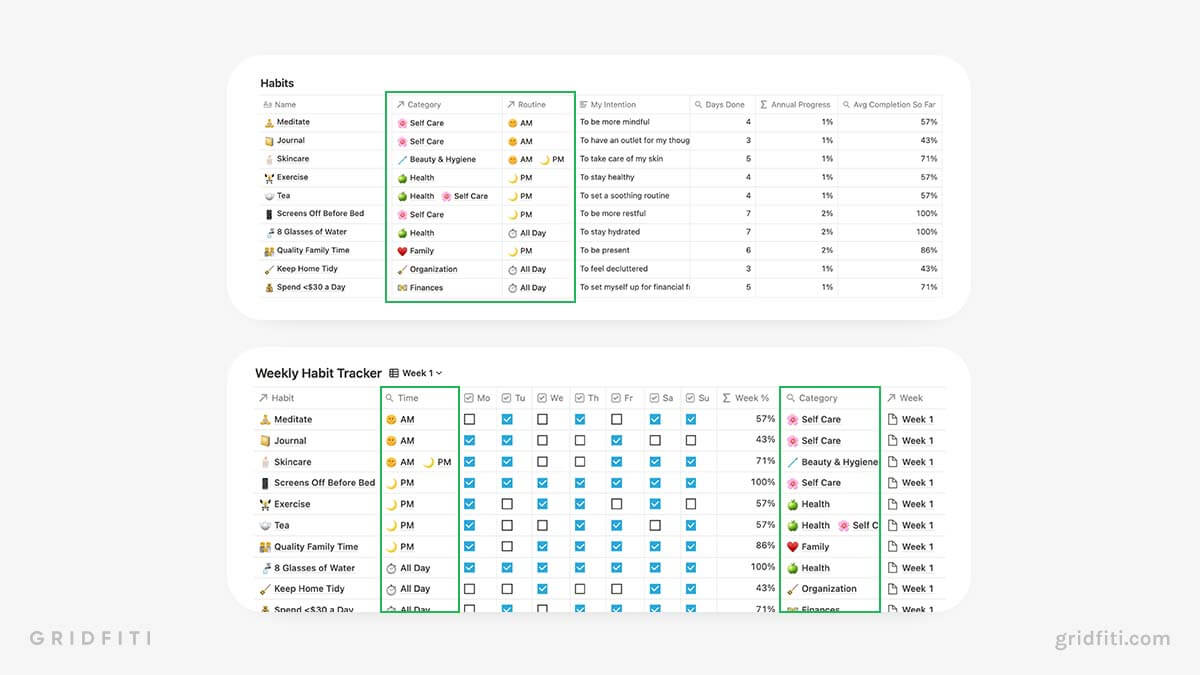
To illustrate how to use Rollups to show data from another related database, let’s look at our Habit Tracker template.
Users first set their habits in the bottom “Habits” database (top). Then, in the “Weekly Habit Tracker” database (bottom), whenever they select a habit (which is a Relational property), the Rollup properties “Time” and “Category” populate automatically!
Views
Database views let you see your data in different formats. Notion currently offers 6 types of views:
- Table
- Board
- Calendar
- Timeline
- Gallery
- List
The Table view is the default database view. It looks and performs like a sophisticated spreadsheet. You can resize columns (but not rows) and add calculations to the bottom of each column.
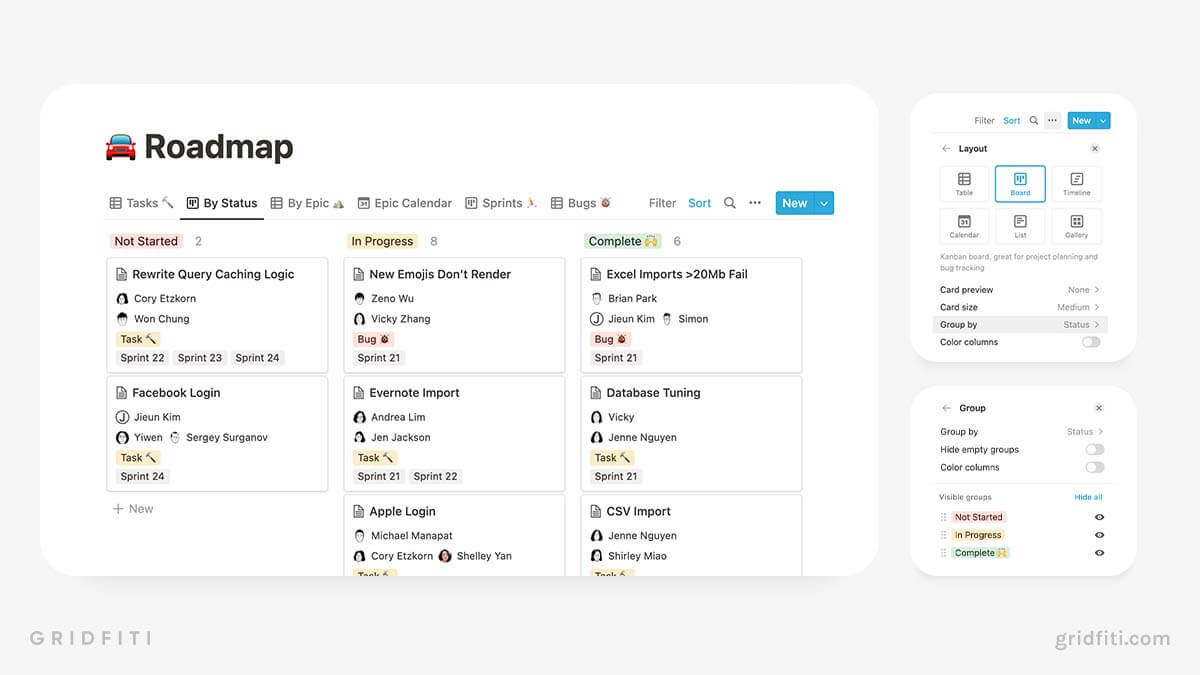
The Board view organizes your database pages Kanban-style. You can choose which property to group by — this will change the columns of your board.
The Calendar view is exactly what it sounds like: a calendar view of the pages in your database. If your database doesn’t have a Date property, the Calendar view will be empty, and all your database items will appear as “No Date” in the top right-hand corner of the database. You can toggle properties on and off within the calendar view, which lets you see more information about your due dates.
The Timeline view organizes your database pages in a timeline format. You can timeline by hour, day, week, bi-week, month, quarter, and year.
The Gallery view lays out your database items in card format. You can customize whether the gallery cards show the cover image or the page content. You can also choose the size of your cards: small, medium, or large.
The List view is the most minimalist of all the database views, displaying your database items in a simple list format. Lists are great for offering information at a glance, but the properties in a list view can be a bit tricky to edit.
Notion has planned some cool updates for databases later this year. Our favorite announcement from the 2022 Block x Block conference is the Google Calendar integration, which will display Google Calendar events right in your Notion database!
Filters
Filters let you include or exclude database items based on the parameters you set. For example, let’s say you only want to see database items that are due on a specific date. To do that, you’d set up a filter.
Applying a filter doesn’t delete or alter the database pages — it just includes or excludes certain pages based on your criteria. Any new database views you create will not be filtered unless you add a filter.
These are the 3 elements of a filter:
- Property
- Criteria
- Value
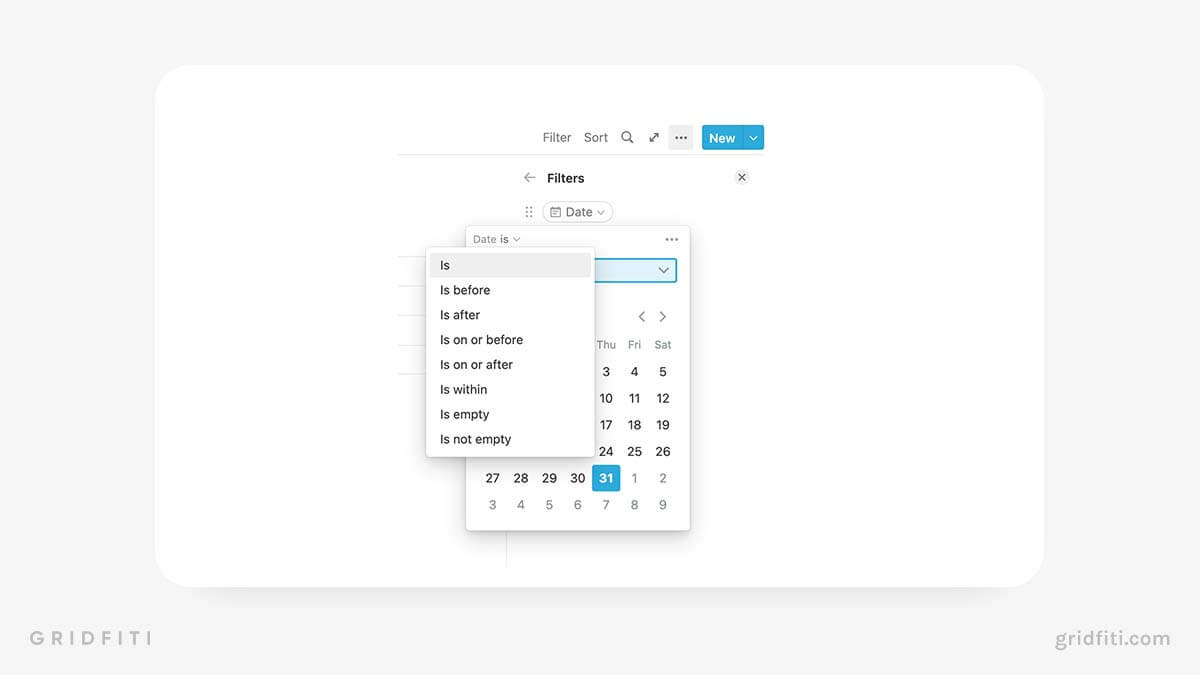
You can filter your database by any property, including your Title property. Different properties have different criteria — for example, the Date property has more criteria than the Text property:
You can add multiple filters to each database view. This lets you get super granular. Check out the filters I use to see what freelance writing and editing work I have due each week:
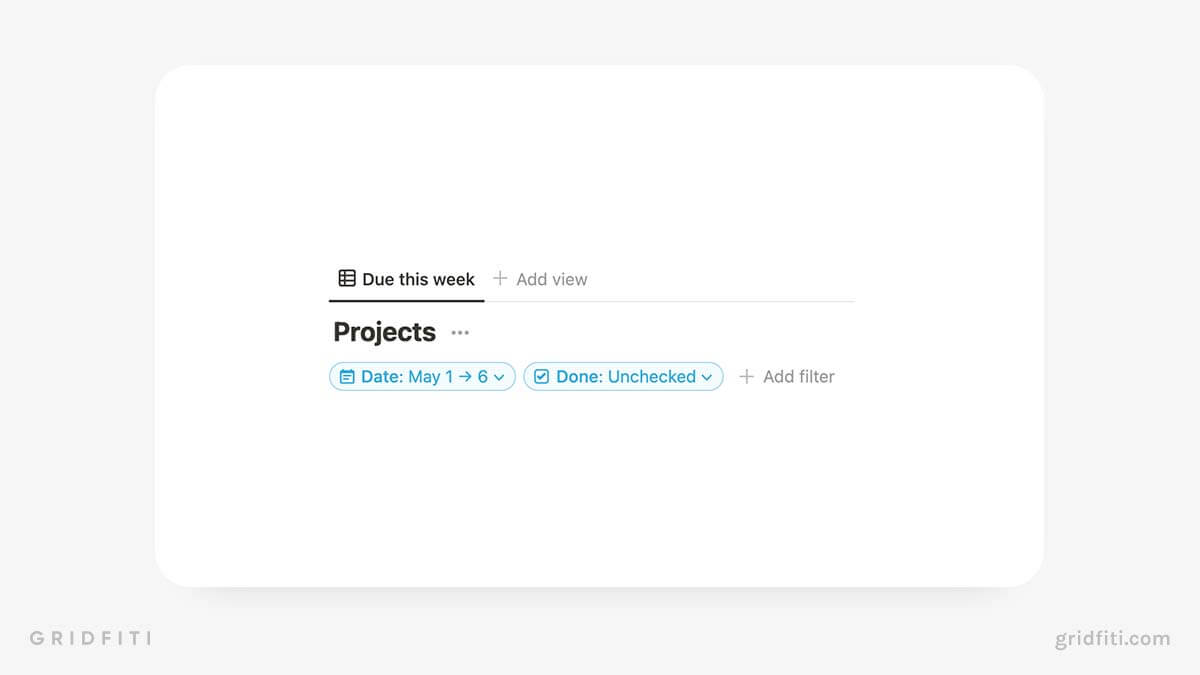
This screenshot is from my Second Brain database, which houses all my tasks, including client work, home, and blog. As you can see, the “Due this week” view shows me uncompleted work tasks that are due between 2 dates.
This is just one of many examples of how to use Notion’s filters to see information in context. Feel free to experiment with filters to see what you can do!
At its 2022 Block x Block conference, Notion revealed a bunch of upcoming improvements to database filters, including quick filters and more control over who can see filter views. Check out all the upcoming features on Notion’s blog!
Groups
As the name suggests, Groups let you group database pages together depending on your criteria.
Let’s say you have a task management database, and you want to see all your completed tasks in one group, all your in-progress tasks in another group, etc. Groups let you do that.
To add a new group:
- Click the 3-dot menu located in the top right-hand corner of your database.
- Select “Group by” and then your status property.
- Voila! Now you can see which tasks are completed, which are in progress, and so on.
Toggle groups on or off to show or hide them. You can also hide all empty groups with a single click. The Board view even lets you add sub-groups, which leads us to the next section.
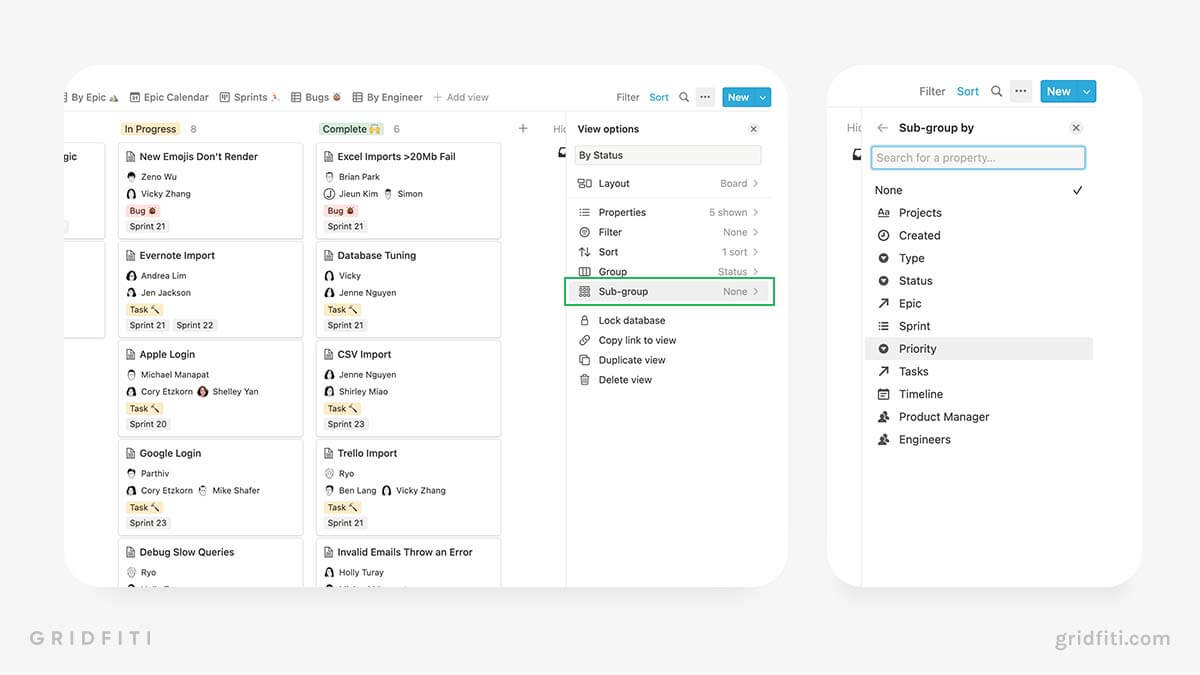
Sub-groups
Sub-groups are unique to Notion’s database board views. The sub-group option lets you add a group within a group.
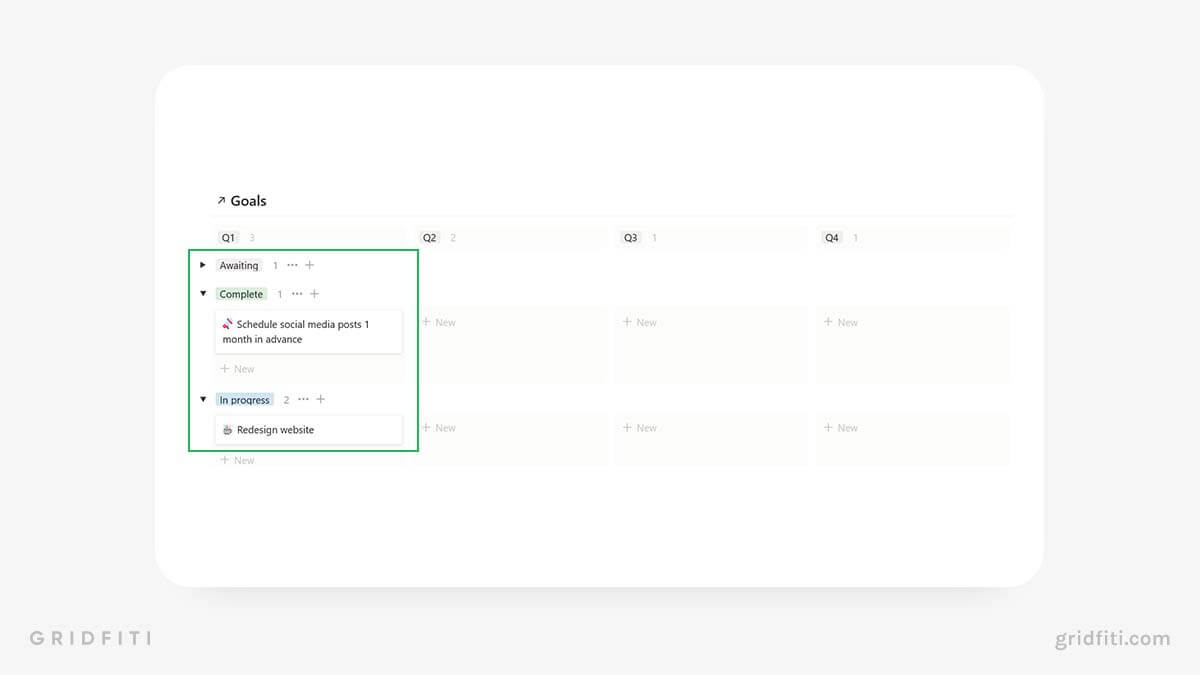
To illustrate, check out the board view of my Goals database. I’ve grouped my goals by quarter and sub-grouped them by status. This shows me which goals I’ve met, not met, or am working toward each quarter:
To add a new subgroup to a board view, click the 3-dot menu in the top right-hand corner of your database, then select “Subgroup”:
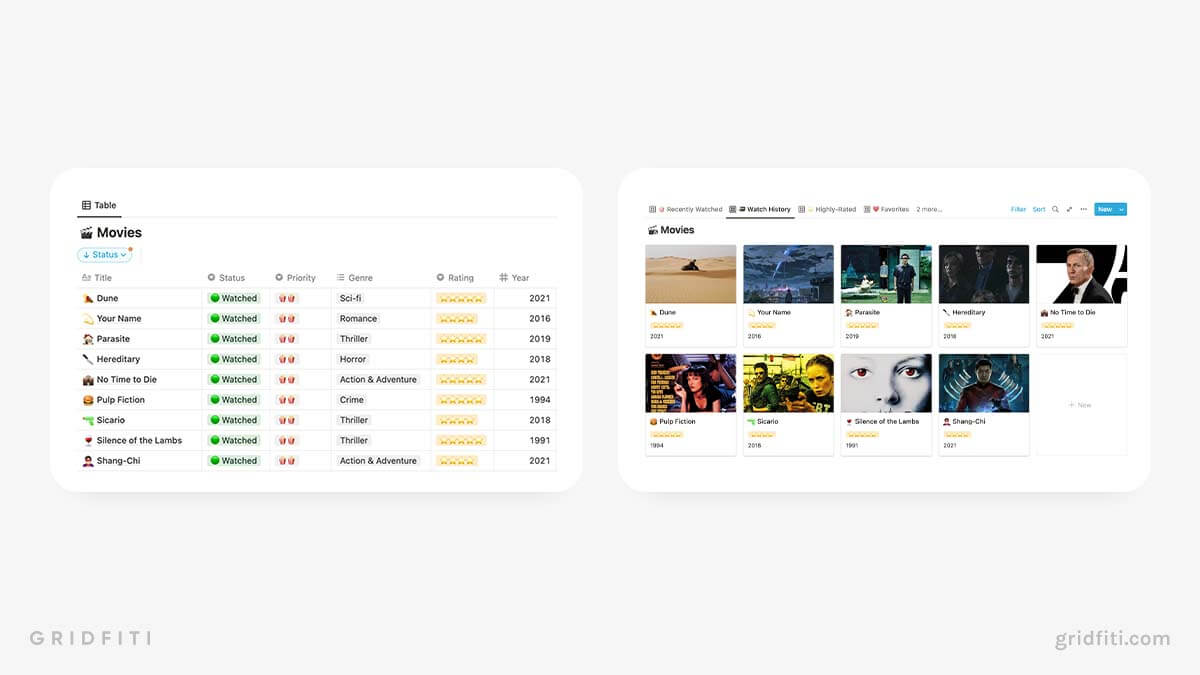
Linked databases
My fave Notion feature! Linked databases let you display a database on any page in Notion.
Functionally, linked databases are technically embedded versions of a Notion database. But to avoid confusion (especially since Notion has a separate “Embed” block for PDFs, webpages, and other media), we’ll refer to them by their official name.
Linked databases let you view the same information with different views – whether that’s view type (Table, Board, Timeline, Calendar, List, Gallery), and/or toggling different properties on and off via filters.
Let’s take our Watch List template for example, the same Movies database can be viewed as both a table and a visual gallery in several parts of the dashboard – all interconnected in the back-end, without creating redundant, duplicate databases.
Any changes you make in a linked database will also apply to the main database. Let’s say you delete pages from a linked database because you don’t want to see them on that particular page. They’ll also be deleted from the database itself. (Again, to hide pages in a linked database, set up a filter instead.)
The table view is the default view that appears when you create a new linked database. To create a different view (board, gallery, list, etc.), you can do so by simply adding a new view in your linked database. At the 2022 Block x Block Conference, Notion revealed a new feature: support for copying linked databases and maintaining customized views!
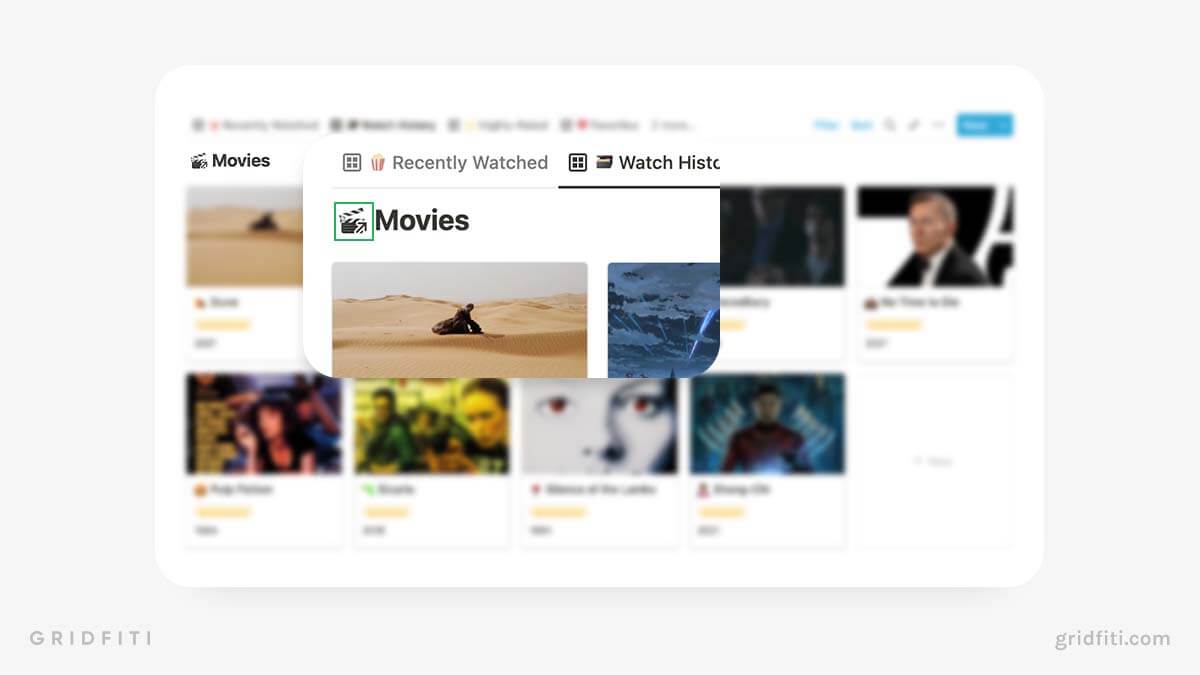
Tip: If you see a small arrow on a database’s icon, that means it’s a linked database, versus your main database! Check out the top-left of this database below:
Notion basics for beginners: a step-by-step walkthrough
Okay, now that you’ve made it through that huge glossary, it’s time to get your hands dirty and start learning your way around Notion.
We’ll walk you through the process of creating your first Notion page and database. Remember, we’ve already covered what pages and databases are in the Glossary section — this section is a tutorial. If you need a refresher, click here to scroll back up to the Glossary section!
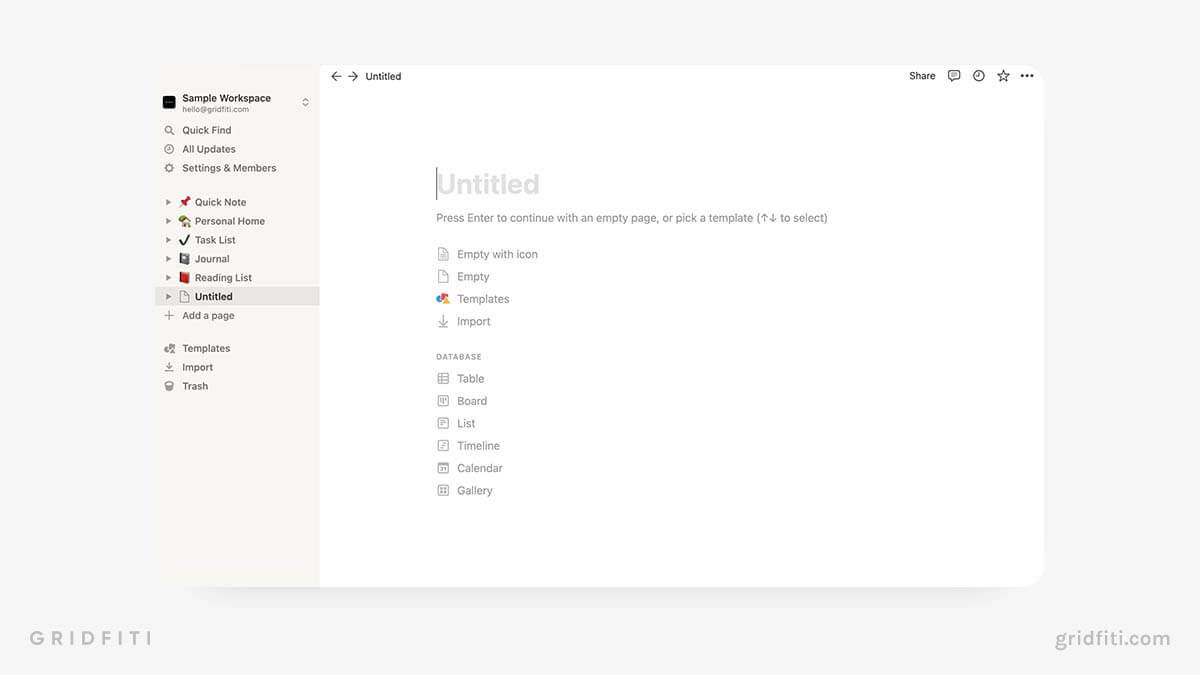
Create your first page
In Notion’s sidebar, click “Add a page” to create your first page. I recommend adding a page title, setting an icon, and adding a cover image.
Test out the commands
Click into your new page and type “/” on your keyboard to open Notion’s full range of commands:
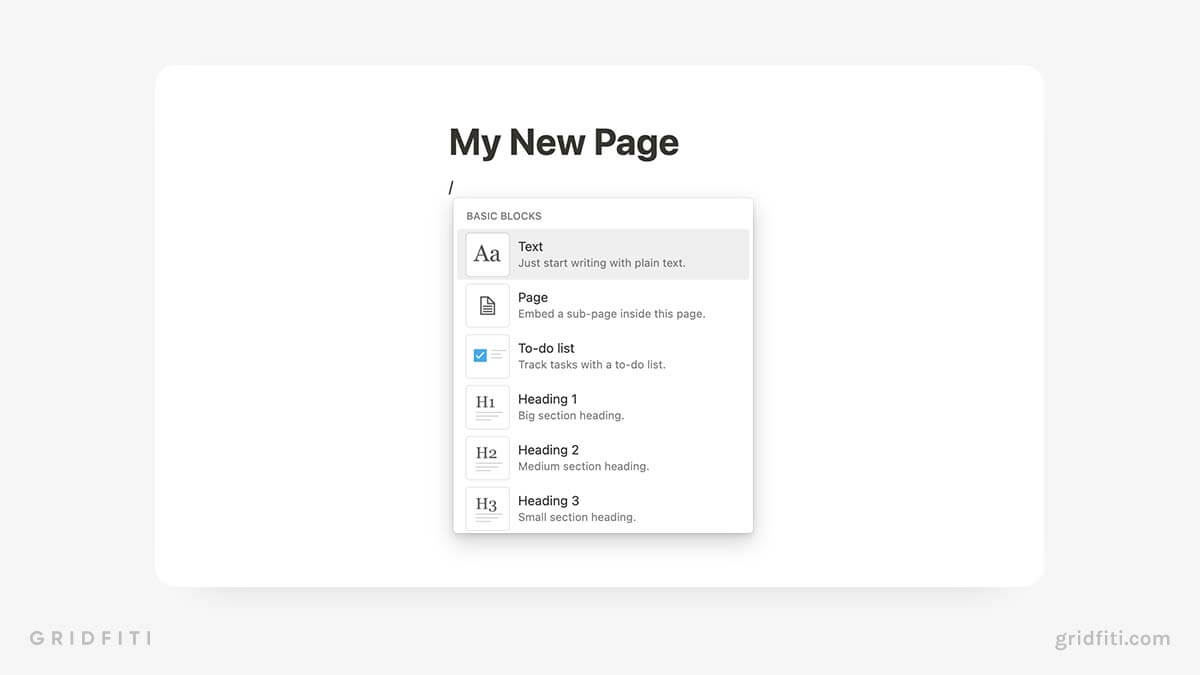
If you know which block you want to insert, start typing the name of the block to search this menu. Then, select the block:
Scroll through all the commands to see what blocks you can add in Notion.
Once you’ve familiarized yourself with what blocks are available in Notion and how they work, you can start memorizing Notion’s keyboard shortcuts to create new blocks faster.
Set up your first database
Now that you’ve created your first page and test-driven Notion’s slash commands, it’s time for the fun part: creating your first database!
You have 2 options: you can either create a full-page or inline database. (We covered the difference between the two earlier in this guide.)
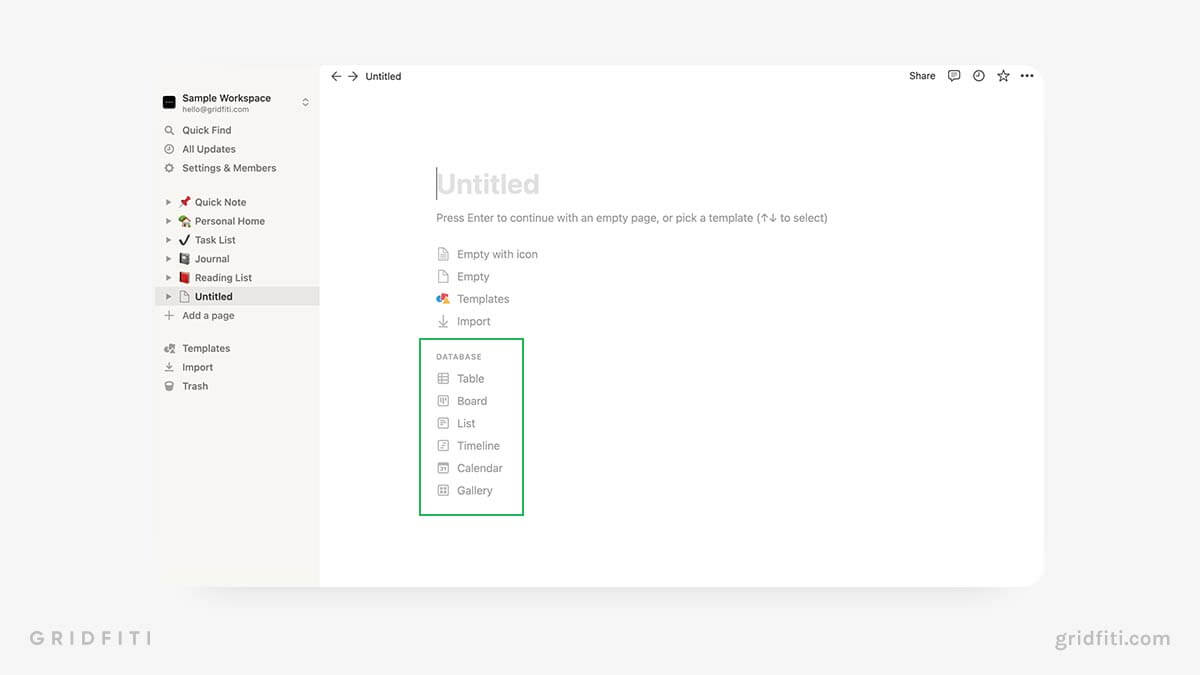
Method #1: Create a full-page database.
Create a new page, then click one of the options below “Database”:
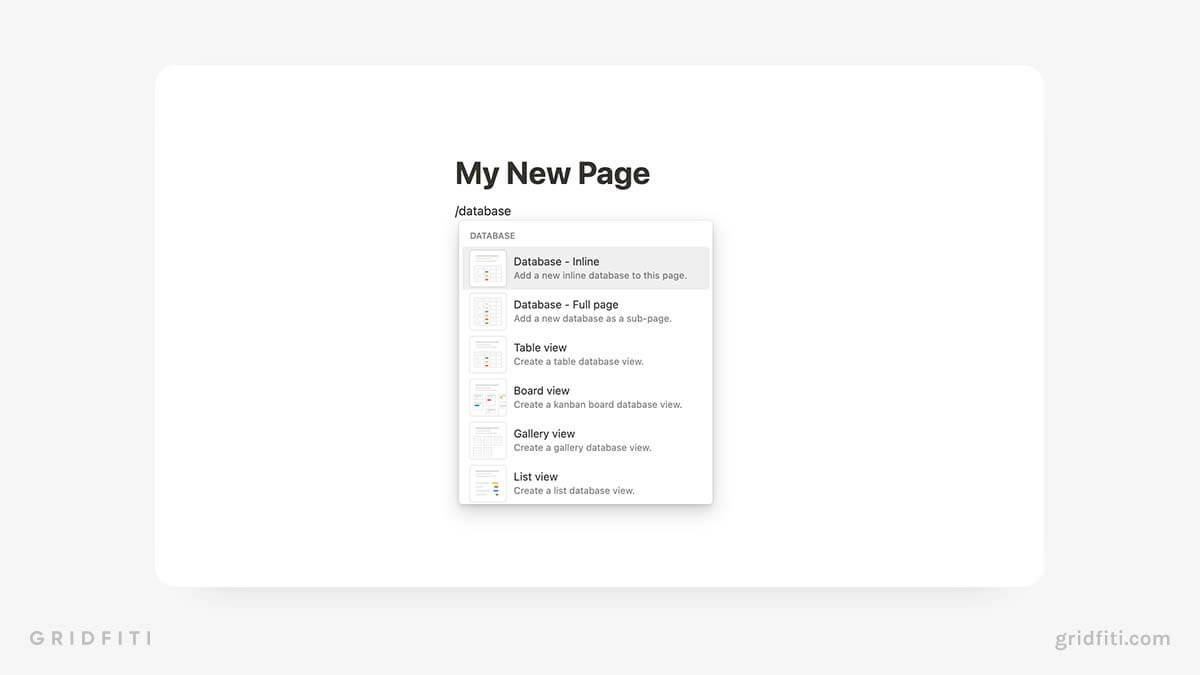
Method #2: Add an in-line database to an existing page.
- Navigate to the page where you’d like to create your new database.
- Click into an empty block and type “/” on your keyboard to open Notion’s slash commands.
- From the pop-up menu, create a new in-line table, board, list, calendar, gallery, or timeline.
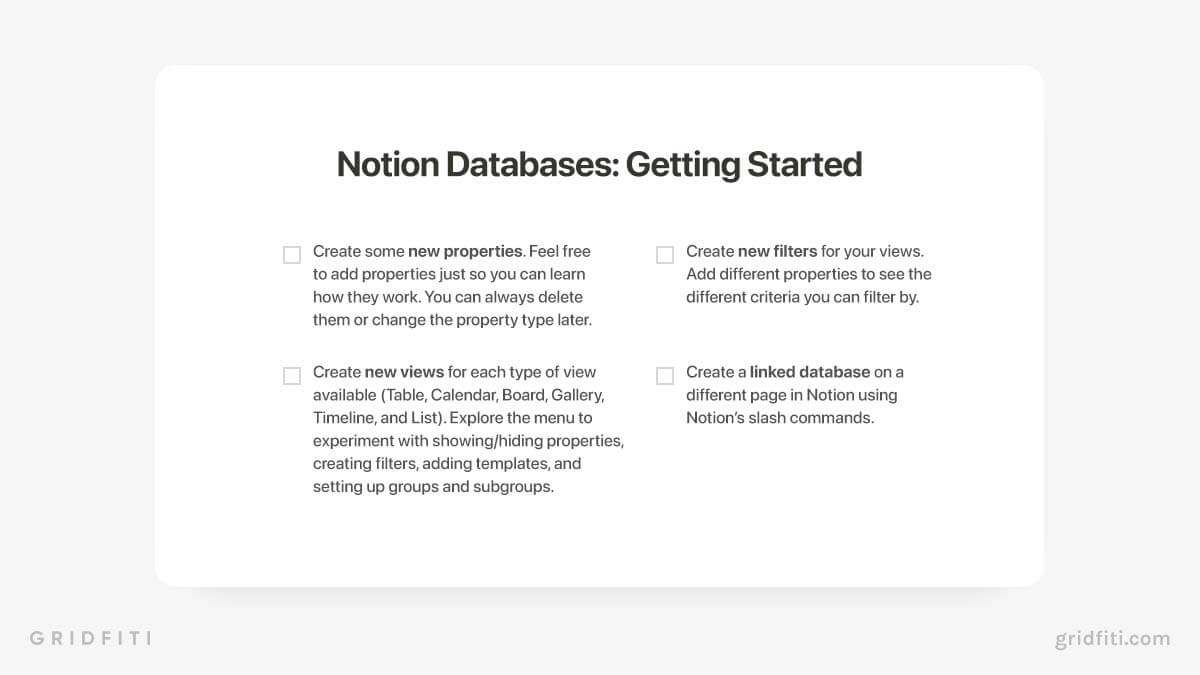
Experiment with views, filters, and properties
Now that you’ve got your database, it’s time to make it your own with views, filters, and properties. (We defined views, filters, and properties in the first section of this guide — click here to jump back up to that section if you need a refresher.)
Here’s a handy checklist you can use to learn your way around your fancy new database:
How to create and customize an aesthetic Notion dashboard
Now that you’ve learned your way around Notion, it’s time for the fun part: creating and customizing your first ~aesthetic~ Notion dashboard!
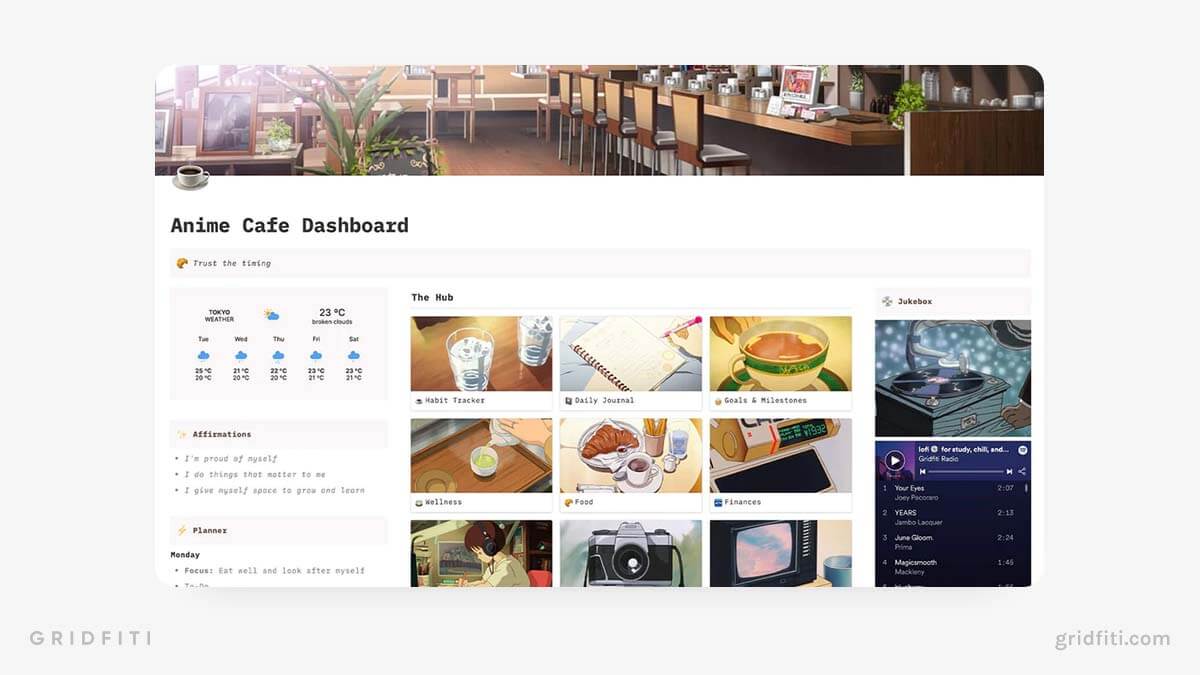
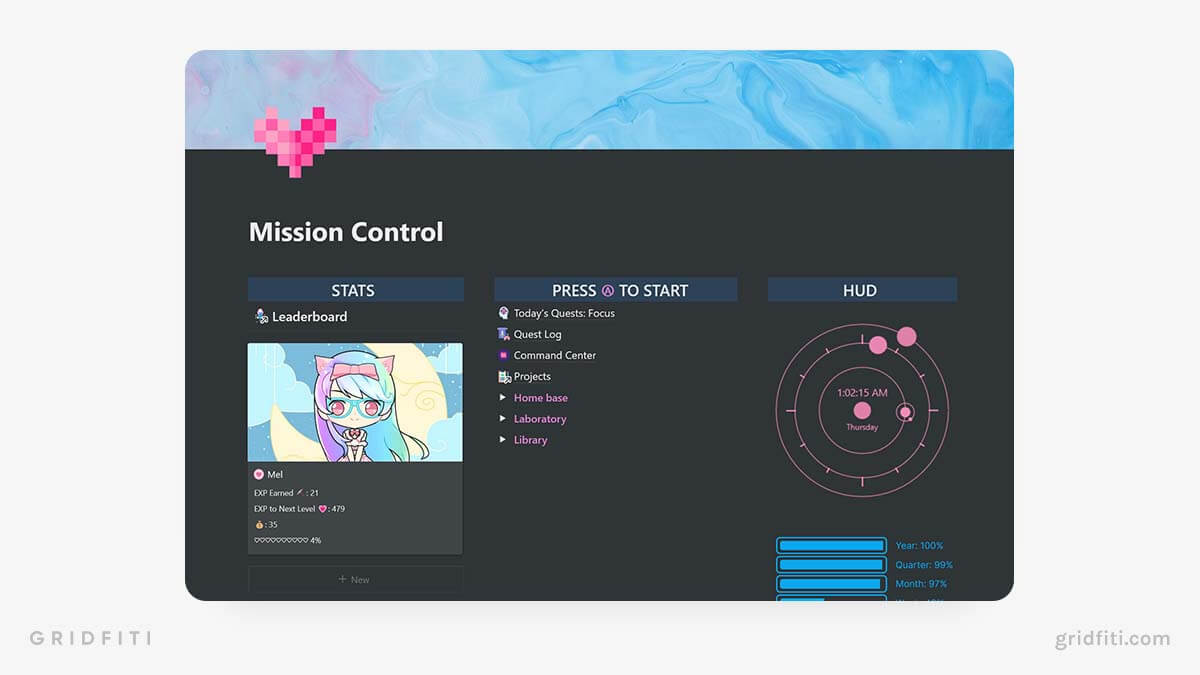
If you’re new to Notion, you’ve undoubtedly seen those soothing Studio Ghibli-inspired aesthetic Notion templates complete with colorful GIFs and embedded lofi playlists (like our Anime Cafe All-in-One Life Dashboard Template):
Here are 3 tips for creating a beautiful yet functional Notion dashboard that you’ll actually be excited to use!
Tip #1: Create your own page icons, covers, and headings in Canva
Related Post: Aesthetic Canva Templates
To add an uber-personal touch to your Notion dashboard, create your own icons, covers, and section headings in Canva.
Canva is a free photo editing platform that’s super easy to use. Here’s a sneak peek of the branded headings I created in Canva for my Notion blog dashboard:
Notion pages are responsive to your device, so the size of your custom headings may be slightly different on phone or tablet.
Before you dive into Canva, check out our guide to the best dimensions for custom Notion covers, plus our favorite aesthetic Notion headers!
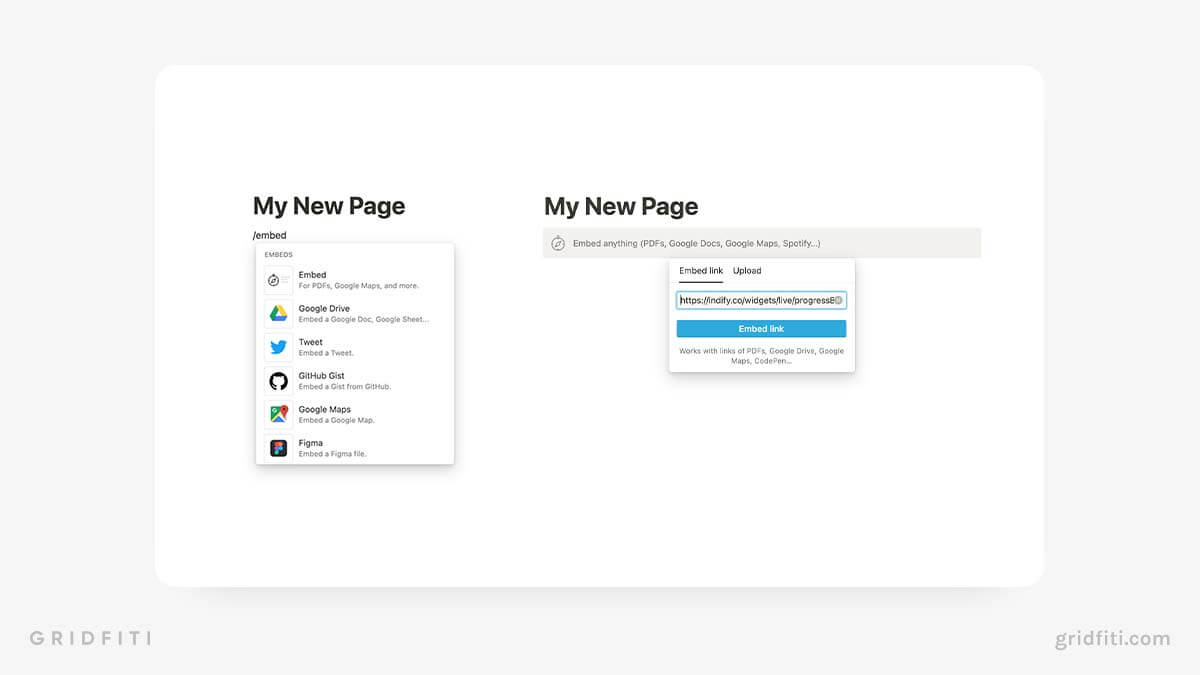
Tip #2: Create your own widgets
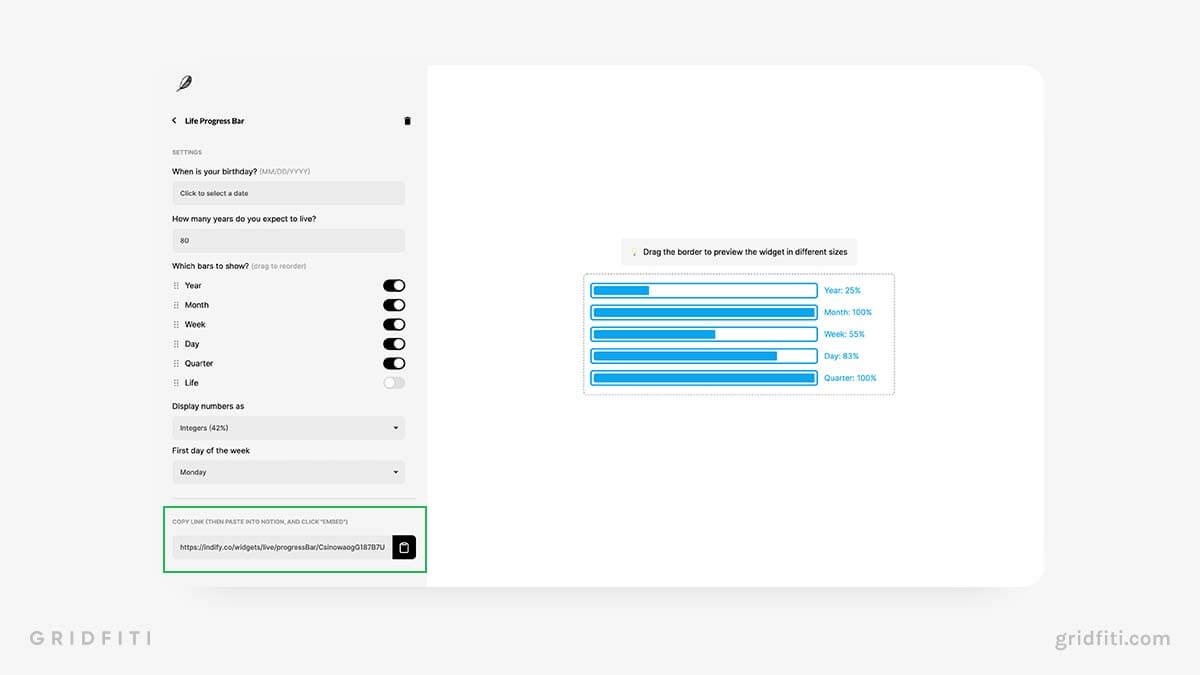
Ever wondered how to get those fancy clock and countdown widgets you’ve seen in popular Notion templates? Indify is the answer. For more ideas, check out our full round-up of the best Notion widgets to embed in your workspace!
Indify lets you create and customize your own Notion widgets for free. Just sign up for an account and start creating! No coding knowledge or experience required.
Once you’ve created your widget, simply copy the Indify code and paste it into a new Notion “Embed” block.
When you’re done, your dashboard might look something like mine!
Tip #3: Explore Notion apps and extensions
If you’ve read any other Notion resources, you’ve likely seen users talking about third-party extensions and Notion’s official API (which lets you integrate Notion with other apps, like Google Calendar).
We’ve already talked about Notion integrations in another post, so for now, we’ll focus on third-party extensions. These plug-and-play scripts improve the look, feel, and functionality of Notion — no coding knowledge required. Here are a few of our faves:
- Notion Enhancer: A free desktop and browser customizer that lets you change color schemes, add new features, and more.
- Notion Extensions: A freemium suite of extensions that lets you add charts, recurring events, and more.
- Notion Web Clipper: A free browser extension that lets you save web content directly to a Notion database in one click.
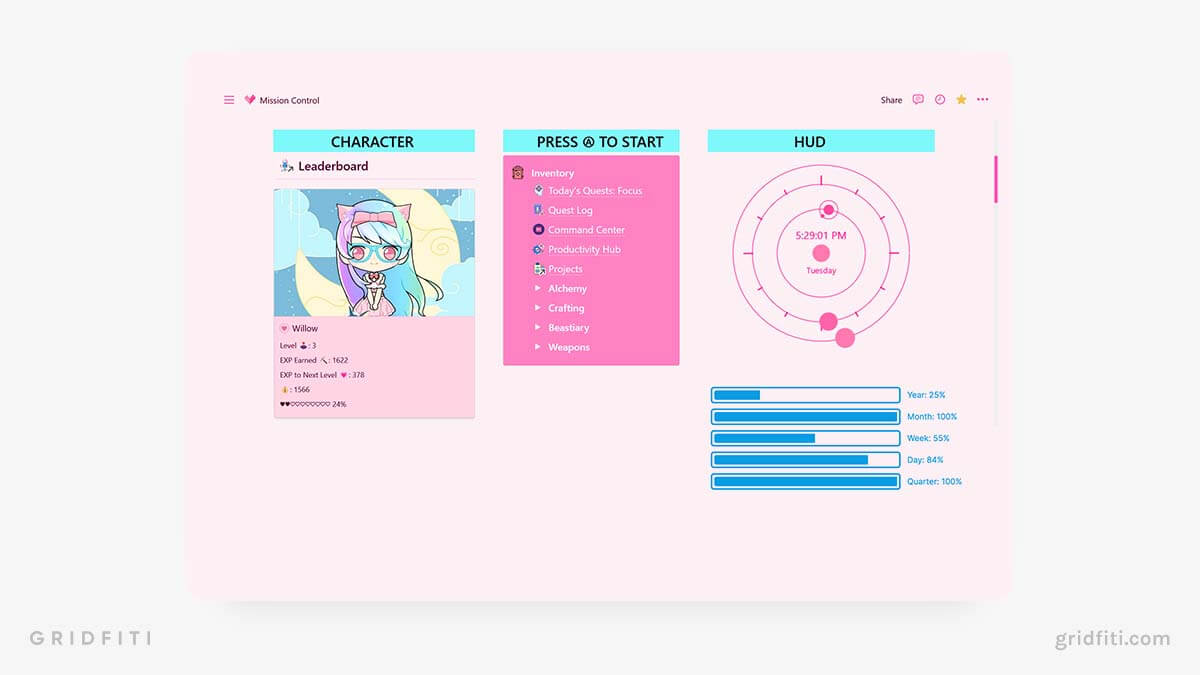
These are just 3 extensions that will take your Notion to the next level. Check out how I use Notion Enhancer’s browser extension to “pinkify” my Notion (ain’t it purdy?):
Once you’ve got a solid understanding of how Notion works, experiment with some of these extensions to see what you can build!
Notion drawbacks and limitations
No program is perfect, and that includes Notion. As you read more Notion tutorials and continue to engage with the community, you’ll see some talk about Notion’s limitations. Let’s explore them so you’re aware of what you can’t (or shouldn’t) do in Notion.
Security concerns
A quick Google search will turn up dozens of posts and articles expressing concern over how secure Notion “really” is. At the time of publication, Notion is SOC 2 Type 2 compliant. This means Notion has authentication controls in place to prevent unauthorized access to customer data.
The main concern among users is that Notion employees could access your data and potentially steal or abuse it.
Select Notion employees can access your workspace, but only after you authorize it. (According to Notion, the only employees who are authorized to do this are “those who need it do to their jobs.”)
Access is revoked by default. To grant or revoke access, select Settings & Members > My account. Scroll down to Support access and click “Allow access”.
While we don’t necessarily think a rogue Notion employee will hack into your account and read your notes, we understand why some users are concerned. That’s why we don’t recommend storing sensitive data — including passwords and bank account information — in Notion.
No offline mode
While Notion does work offline to an extent, it doesn’t offer a “true” offline mode like Google Docs. While you can make changes to a page while you’re offline, you can’t download or make pages available offline permanently. Which means your changes will only sync when you go back online.
This is a major pain point for many Notion users. Apart from the occasional outage, we haven’t experienced many issues with using this cloud platform. But it’s worth keeping in mind if local or offline storage is important to your workflow.
No recurring dates
If you’re keen to set up a task management solution in Notion and you work with a lot of recurring dates, we have some bad news for you. Notion doesn’t let you set up recurring tasks. You’ll need to create a new database item for each due date. It’s a cumbersome process, to say the least.
Fortunately, you can set up recurring dates using third-party platforms like Notion Extensions. But this feature isn’t available natively yet. Fingers crossed, though!
Notion for beginners: wrapping up
Phew! We know that was a mountain of information to get through. Thanks for bearing with us, and congrats on making it to the end!
Now you should have everything you need to build a unique workflow in Notion that suits your needs and preferences. What’s next? Save this post to your digital library in Notion so you can easily relocate it for future reference. Then, start creating!
Need more resources or inspiration? Check out Gridfiti’s Notion round-ups, Notion templates, and even full list of Notion resources.