From its f/1.8-2.8 lens to the 20.2 MP sensor to its tilting touch screen display, the Canon G7 X Mark II has become a go-to camera for novice photographers and vloggers due to its versatility and portability.
With so much capability, it can get quite tricky to dial in the settings to get this camera just right, whether it be for vlogging, photos, casual portraits or cinematic capture. It’s crucial to understand the best settings for different situations – so we’ve put together a quick guide for the best Canon G7 X settings for any scenario!
Whether you’re new to the point-and-shoot world and want to get some aesthetic flash photos, or an experienced vlogger looking to improve your footage, check it out to maximize your G7 X journey!
For more tips, check out more of our film photography guides!
Looking to get the film look with your digital photos? For less than the price of buying and developing a single roll of film, our Lightroom preset packs are useable on as many photos as you take.
Table of Contents
- Best G7 X Settings for Vlogging
- Best G7 X Settings for Photos
- Best G7 X Settings for Flash Portraits
- Best G7 X Settings for Cinematic Footage
- Best G7 X Settings for Time-lapse Videos
- Best G7 X Settings for Underwater Photos
Canon G7 X Settings for Vlogging
The G7 X has been the golden standard for vloggers since time – it’s even the camera Emma Chamberlain started with! To get your G7 X geared up for vlogging and lifestyle video capture, try out a few of these settings recommended by @geminivlogs on YouTube.
- It goes without saying, but start with putting the camera into movie recording mode (video camera icon on the wheel) to start capturing video.
- If you’re in a setting with good lighting and you dig a slightly moody, underexposed vibe – turn down the exposure compensation knob to -1.
- Set Movie recording size to the highest quality frame rate, which is FHD 59.94P – this does take up more space, so combine this with a fast and high storage SD card or adjust the quality to suit your storage options.
- Set the white balance to AWB (automatic white balance) as this feels the most natural and will adjust to the changing color temperatures of your surroundings.
- The Auto Lighting Optimizer corrects image brightness & contrast in video capture. Set this to high if you find you’ll be in very bright settings or low if you’re in dark settings. The idea is to always be in well-lit environments, but this option is there to compensate if you cannot control this.
- Have the Auto-Focus method set to face tracking so the camera automatically senses your face and blurs out background and foreground elements. Below are the instructions to set the face tracking:
- Go to Menu and hit the camera icon.
- Within Menu 3 under AF Tracking, select Face Tracking.
- Within Menu 2, Turn ‘Face ID’ on and select ‘Add to Registry’ and follow the instructions to take photos of your face so the tracking recognizes it.
- Within Menu 4, under IS settings, set IS Mode to ‘Continuous’ and Dynamic IS to ‘Standard’.
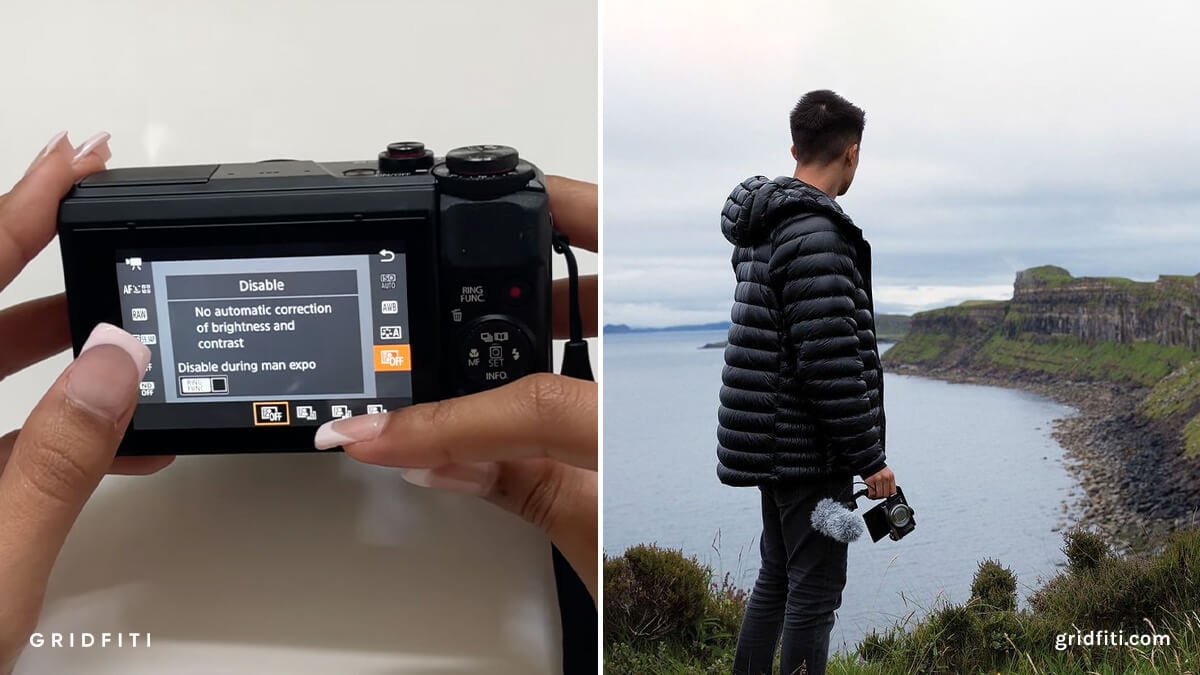 Frames via @geminivlogs (check out their video for a visual walkthrough!) and Canon x MikeVisuals
Canon G7 X Settings for Photos
To get great photos from your G7 X, try out a few of these settings that Ulysses Aoki suggests!
- Minimize your screen to nothing but the image in front of you. Remove all the information displayed on your screen by pressing the ‘Info’ button a few times until it is removed. This lets you capture with no distractions in the way!
- If you want slightly underexposed and richer shots, you can set your exposure compensation knob to -1 or -3. This darkens down the overall photo and achieves denser colors.
- If you do want to play with slow shutter or fast shutter modes to get an aesthetic motion blur look, then take it to ‘Tv’ mode to adjust that shutter speed and let the camera do the rest.
- For Auto-focus, select ‘1-point AF’ which gets your camera to focus on one point. It’s a matter of overlaying this point over your subject and letting your camera adjust its focusing towards that point.
- With the G7 X sensor being a 1” crop sensor, that bokeh look (blurred background from your subject) is harder to achieve, so try to ignore the lower aperture shooting in favor of apertures that are f/4 and above for wider focal range shooting.
- With the form factor of the G7 X, manual photography most definitely is an option, but the casual nature of it works best in aperture priority mode. It’s a matter of turning your knob to ‘Av’ and adjusting the f-stop to your liking and shooting away.
- It goes without saying: shoot in RAW! Yes it may be a crop sensor, but getting the most quality out of your photos allows you to edit and take your photos to the next level.
Take your G7 X photography up a notch with Lightroom presets – whether they’re for blogging, many different aesthetic styles and more!
 Frames via Ulysses Aoki and @bro0ketini
Canon G7 X Settings for Flash Portraits
This one’s quite simple: with the camera being built for automatic capture, just getting the flash to always engage is a breeze! Get that retro and candid vibe with the flash always on using this method below:
- When set to automatic, the G7 X’s flash will only activate when the camera’s sensor deems that there is not enough light available.
- If you want the flash to always trigger, for some dreamy daytime flash shots or anything in between, you’ll need to set the flash to go off in Manual mode:
- Note: this does require the need to constantly adjust your settings if your lighting is changing as you are in manual mode. If your lighting remains the same, then it’s just a matter of having your aperture and shutter set, and shooting with flash as you please.
- Start off by getting your flash to come out by hitting the little flash switch on the side of the camera.
- Turn the camera’s top knob to the ‘M’ for Manual setting, and voilà! That’s it. Your flash will now always go off – just be sure to adjust the settings as you shoot along to avoid overexposed shots.
Want to take those casual flash portraits to the next level? Give them a nostalgic treatment with some disposable camera Lightroom presets or retro Lightroom presets!
 Frames via @neutrallyashlan and @bekskerridge
Canon G7 X Settings for Cinematic Footage
Who says you can’t carry around your portable G7 X and have it capture cinematic video? Check out these 5 tips provided by Francis Darracott on how to get the best video out of your camera settings:
- Use that built-in ND filter! ND filters are essentially sunglasses for your camera. Just remember to turn it on or off depending on if you’re outdoors where it’s bright, or indoors where it’s darker. The ND filter allows you to crank the aperture low, and achieve some bokeh in bright settings.
- A great hack for this is to turn your function button on the G7 X into the ND filter button – this allows you quick access to turning the ND filter on and off.
- Do this by going into your Menu, tap the camera icon, and under Menu 2, scroll to the ‘Set Ring Function Button’. Set it to ‘ND’ and you’re good!
- Use the camera’s built-in Image Stabilization (IS) system to mitigate camera shake and keep your videos smooth.
- To configure this, navigate to your Menu. Look for the camera icon and then proceed to Menu 4. Here, find the ‘IS Settings’ and select ‘Standard’. This prevents the IS system from overcorrecting and potentially warping your footage!
- Dial in your fps (frames per second) settings just right. 24fps is widely recognized as the standard to capture cinematic video. If you’re looking to get smooth, slow motion footage, 60fps allows you to achieve just that. Combining this with the camera’s built-in IS makes for seamless and easy cinematic video capture.
- Get your camera’s autofocus (AF) system to actively track your subject by simply tapping the subject on screen. The camera’s built-in computer does wonders in finding and tracking your subject so they stay in focus during movement, panning, and zooming.
- Use the camera’s ‘locked exposure’ feature to keep the lighting and exposure consistent as you pan your camera through different brightness settings.
- As you’re recording in video mode, select the little star icon on the top right of your screen to lock exposure with the lighting you’re pointing at.
If you’re looking for cinematic ways to edit your photos, check out our round-up of cinematic Lightroom presets!
 Frame via Ulysses Aoki
Canon G7 X Settings for Time-lapse Videos
Getting your little point-and-shoot to capture a long time-lapse can be daunting. Check out these methods Justin Odisho uses to dial your camera in just right.
- Set your dial to video mode. Within video mode, hit the camera icon on the top left of the screen to bring up the different modes. From here, select ‘Time-lapse movie’.
- Time-lapses are a game of setting your intervals which is how frequently you want your camera to take a photo. Whether it’s every 3 seconds for 20 minutes, or every 5 seconds for 30 minutes. This is up to you and how much action you want to capture over a period of time! Higher frequency will result in smoother video, but will take up more memory (this is where a fast and high storage SD card comes in)
- When in time-lapse mode on your camera, hit the little ‘meters’ icon next to the flash icon on the bottom left of the screen. This opens you up to Standard shooting scenes that are built into the camera at different interval levels.
- Go into this area of the settings and play with the intervals, how many shots you want, and gage the length of your final time-lapse.
- Once you have your intervals set, it’s as simple as placing the camera on a tripod or flat, secure surface. Adjust your tilting screen to show you what the camera sees, start the time-lapse by hitting that shutter button, and let your G7 X do the rest!
 Photo by Justin Odisho
Canon G7 X Settings for Underwater Photos
The G7 X makes for a great underwater camera due to its portability paired with underwater housing, reactive ISO settings and quick auto-focus.
Let’s start with underwater casing – our pick would be the official Canon WP-DC55 waterproof case.
The equally compact casing allows access to camera controls along with a frontal flat-lens guard to protect the lens, while offering a diffuser to soften the light from the camera’s flash.
Since the G7 X requires you to adjust the white balance, we suggest snapping some demo photos underwater, then enter the camera’s menu to adjust the custom white balance. Follow the instructions to set the white balance using one of your underwater demo photos.
The camera’s access to controls through the casing allows you to use different autofocus modes while diving. From macro mode to get closer to your subject without zooming in, to letting your AF do its thing finding subjects on its own, the camera should be able to track focus for video – but give it time with focusing if you’re jumping from subject to subject.
Looking to edit those underwater photos to perfection? Check out our round-up of the best underwater Lightroom presets!
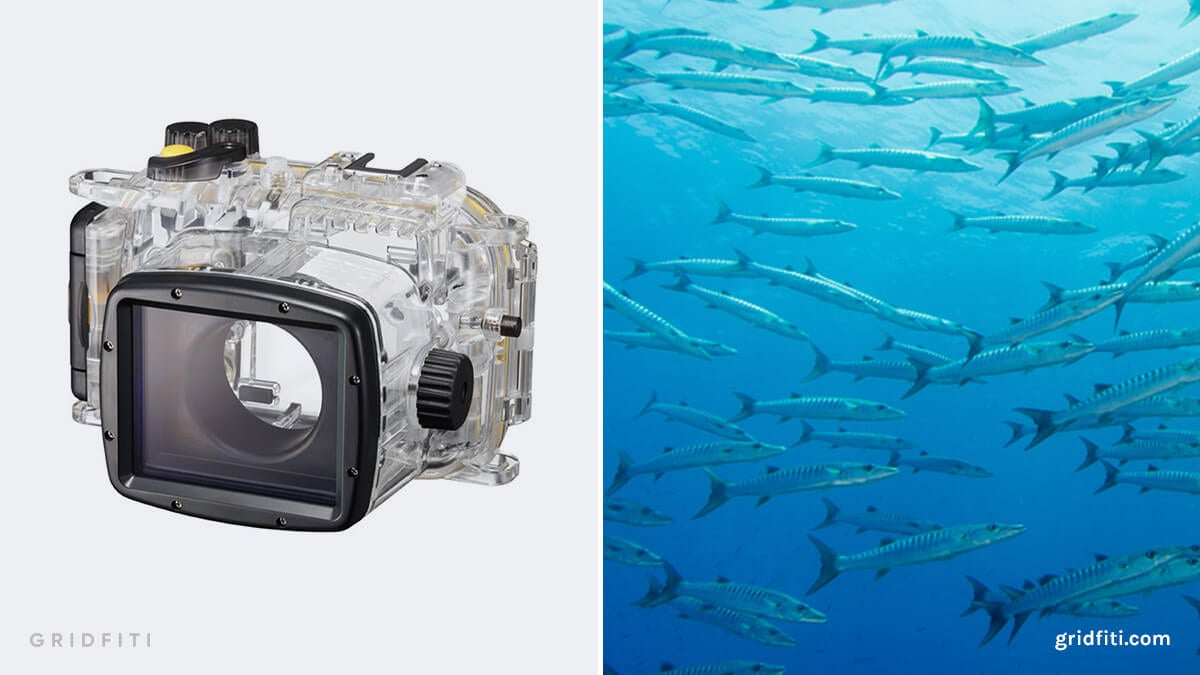 Photo via Bluewater Photo Store
Are there any other Canon G7 X settings you think we should include? Let us know in the comments below!
Gridfiti is supported by its audience – when you buy something using the retail links in our posts, we may earn a small commission at no additional cost to you. Read more about our affiliate disclaimer.