In March 2023, Notion dropped a game-changing update: revamped buttons complete with automation capabilities. Want to start using this feature in your workspace but not sure where to start? Read on to learn how to create buttons in Notion, plus 13 ways you can use them in your work, student, and personal dashboards!
Looking for more productivity tips and tools? Subscribe to The Flow — our quick, snappy, value-packed focus and recharge newsletter. Also, don’t miss our several other Notion template round-ups and guides!
Table of Contents
How to Set Up Notion Buttons
Setting up Notion buttons is super quick and easy. Here’s how to do it:
- Create a new Button block by typing the slash key [/] on your keyboard and searching the block menu for “button”.
- Give your button a title and an icon (optional but recommended).
- Click + Add a step.
- Select the action you’d like the button to execute when clicked — you can choose from 5 options:
- Insert blocks — Add blocks above or below the button.
- Add page to — Create a new page within a database or another Notion page.
- Edit pages in — Edit an existing page.
- Show confirmation — Show a confirmation pop-up.
- Open page — Open a page.
- Edit the step to your specs. For example, if you’re inserting blocks, you can choose whether to insert above or below the button, as well as which blocks to insert.
- Add additional steps. (These will execute in the order you add them. To reorder your steps, click and drag the block handles (⋮⋮) on the left-hand side of the step.)
That’s it! Easy peasy. Now that you know how to create new buttons in Notion, let’s explore a few ways you can use buttons to save yourself some time, clicks, and keystrokes.
Notion Buttons Ideas & Use Cases
Need some ideas on how to use buttons in Notion? Here are 13 tried-and-tested use cases from real Notion power users to inspire you! Each one includes examples and walkthroughs to help you level up your workspace.
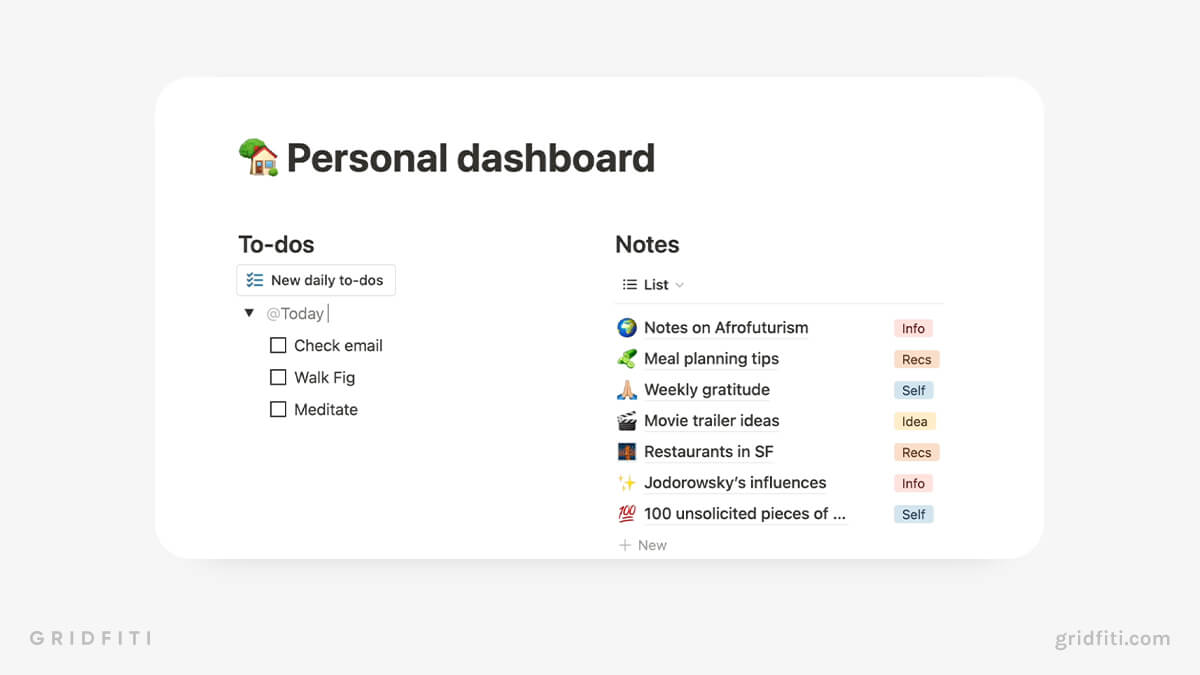
Generating Checklists Automatically
Find yourself completing the same tasks each day? Create a button to automatically add a checklist to a page. This is perfect for anyone who prefers simple checklists over fancy databases for task management. Here’s how to do it:
- Create a button and give it a name, like “Add daily tasks”.
- Set the first step to “Insert blocks”.
- Choose where you’d like to insert the blocks: above or below the button.
- Insert your checklist in the box below.
Keeping Tabs On Your Habits
No matter what you’re tracking — water intake, pages read, or days meditated — Notion buttons make it easy to automate habit tracking.
There are a few ways you can set up buttons to track habits. We recommend creating a database or using a habit tracking Notion template.
For this example, we’ll assume you’ve already got a habit tracking database set up with separate entries for each day and checkbox properties for each habit you want to track. Based on that setup, we’ll show you how to create a new button for each habit:
- Create a new button and give it a name, like “Log reading for today”.
- Set the first step to “Edit page in”.
- Select your habit tracking database.
- Next to “Pages to edit”, click the drop-down arrow to ensure you’re only updating your habits for today. (We recommend using a “Date” or “Created time” property for this and setting the filter for that date property to “Today”.)
- Click “Edit a property”.
- Select the habit/Checkbox property you’d like to update (for example, “Read for 20 minutes”).
- Set the box to “Checked”.
When you click the button, you’ll automatically check off that habit for the day without needing to manually search for and open the page. Duplicate this button for each habit you want to track and repeat Steps 5 and 6.
Capturing New Tasks
Notion buttons are great for capturing tasks on the fly. For this example, we’ll assume you’re tracking tasks in a database. But you could easily change Step 2 below to “Insert blocks” if you prefer checklists. Here’s how to set it up:
- Create a button and give it a name, like “Quick task”.
- Set the first step to “Add page to”.
- Select your tasks database.
- Click the drop-down box on the left side to choose a property you’d like to update when you click the button. In the box next to the property, set your parameters. (For example, you might set your “Due” property to “Today”.)
- (Optional) Click “Edit another property” to update any properties you’d like to appear when you click the button. (These might include status, assignee, priority, etc.)
- (Optional) Add a second step: “Open page”.
- Click “Select page”, then click “New page added”.
Voila! Now you can add new tasks to Notion in just one click without breaking your focus. Setting up a second step to open the task you just created will let you add notes, update other properties, and more.
Storing New Content Ideas
This is one of our personal favorite use cases for Notion buttons: quickly adding new content ideas. This walkthrough assumes you’re storing your content in a dedicated database. Here’s how to set it up:
- Create a new button and give it a name, like “New content idea”.
- Set the first step to “Add page to”.
- Select your content database.
- Click the drop-down box on the left side to choose a property you’d like to update when you click the button. In the box next to the property, set your parameters. (For example, you might set the status to “Idea”.)
- (Optional) Click “Edit another property” to update any properties you’d like to appear when you click the button. (These might include social media platform(s), assignees, publish date, etc.)
- Add a second step: “Open page”.
- Click “Select page”, ****then click “New page added”.
When you click the button, the newly created page will automatically open, allowing you to jot down your idea quickly and seamlessly — no more forgotten content ideas!
Adding New Recipes to Notion
Notion is one of the best tools for organizing your meal plan, grocery list, favorite recipes, and pretty much anything that’s food-related.
For this example, we’ll show you how to create a new page in your recipes database so you can quickly paste in links, ingredient lists, instructions, and more.
- Create a new button and give it a name, like “New recipe”.
- Set the first step to “Add page to”.
- Select your recipes database.
- Click the drop-down box on the left side to choose a property you’d like to update when you click the button. In the box next to the property, set your parameters. (For example, you might update the “Tags” property to “New recipe”.)
- (Optional) Click “Edit another property” to update any properties you’d like to appear when you click the button. (These might include ingredients, health rating, efforts, etc.)
- Add a second step: “Open page”.
- Select “New page added”.
From here, you can quickly paste in the link to the recipe (or the full recipe itself) for each new page you create.
Related: Best Notion Meal Planner Templates
Tracking Homework & Assignments
Using Notion as a student? Buttons make it easy to add and update assignments. Here’s how to quickly add new assignments to a dedicated Notion database using buttons:
- Create a button and give it a title, like “New essay”.
- Set the first step to “Add page to”.
- Select your assignments database.
- Click the drop-down box on the left side to choose a property you’d like to update when you click the button. In the box next to the property, set your parameters. (For example, you might update the “Type of assignment” property to “Essay”.)
- (Optional) Click “Edit another property” to update any properties you’d like to appear when you click the button. (These might include status, class, due date, etc.)
- Click “Edit properties”.
- Edit whatever properties you’d like to add to the new page. These may include status, class, or type of assignment.
- Add a second step: “Open page”.
- Select “New page added”.
Now, whenever you click your button, you’ll automatically create a new assignment with all the relevant properties already filled in. Adding a step to open the newly created page lets you input due dates, resources, and other details, as well as apply a database template.
Related: Notion Templates for Students: A Full Guide
Saving Resources to Notion
If you save articles, courses, and other resources in Notion, this button use case will come in handy.
Of course, Notion’s web clipper browser extension is great for saving stuff you find on the web. But creating a button lets you take it a step further by automatically updating properties or opening the page with the newly saved resource so you can add your own notes.
For this example, we’ll assume you have a resources database already set up.
- Create a button and give it a name, like “New course”.
- Set the first step to “Add page to”.
- Select your resources database.
- Click the drop-down box on the left side to choose a property you’d like to update when you click the button. In the box next to the property, set your parameters. (For example, you might update the “Type of resource” property to “Course”.)
- (Optional) Click “Edit another property” to update any properties you’d like to appear when you click the button. (These might include the priority, subject, etc.)
- Add a second step: “Open page”.
- Select “New page added”.
Opening the page you just created will let you add details or notes that are specific to that resource.
Related: 50+ Notion Resources to Level Up Your Life
Staying On Top Of Chores
Here’s a Notion button use case from our staff! Let’s say you have a master chores database. Instead of adding new pages to the database every time you complete a chore, you simply have one page for each chore, as well as a “Date last completed” property so you can see when you last completed that chore.
For this example, we’ll show you how to update the “Date last completed” property to “Now” for each chore with the click of a button. Here’s how to set it up:
- Create a button and give it a name, like “Took out the trash today”.
- Set the first step to “Edit page in”.
- Select your master chores database.
- Set a filter for the chore you’d like to update — most likely the page title. For example, you might filter for where “Page title” is “Take out trash”.
- Click the drop-down box on the left-hand side and select your “Date last completed” property.
- Click the empty box to the right and click “Now”.
- (Optional) Click “Edit another property” to edit any properties you’d like to appear on the new page when you click the button. These might checkboxes, statuses, dates, etc.
Once your button is set up for one chore, duplicate it and repeat Step 4 for each chore.
If you want to get really fancy, you can set up formulas to calculate when the chore is next due based on your “Date last completed” property. Need some help with formulas? Check out our comprehensive guide to the best Notion courses.
Tracking Time
Using Notion to track time was a little cumbersome before buttons came along. Thankfully, Notion’s buttons make it easier than ever to log your hours.
For this example, we’ll create 2 buttons: 1 to start the time tracker, and 1 to stop the tracker. We’ll assume you’ve got a dedicated time-tracking database already set up with 3 properties: 1 for start time, 1 for end time, and 1 “Created time” property that automatically updates with the date and time the page was created.
Here’s how to set up the “Start” button:
- Create a button and give it a name, like “Start”.
- Set the first step to “Add page to”.
- Select your time-tracking database.
- Edit the “Start time” property to “Now”.
- (Optional) Click “Edit another property” to update any other properties you want to appear on the newly created page. These might include tags, client, priority, etc.
Now, let’s create the End button:
- Duplicate the button you just made.
- Rename your new button to “End”.
- Set the first step to “Edit page in”.
- Next to “Pages to edit”, set up a filter where “Created time” is “Today”.
- Click “Edit another property” and select your “End time” property.
- Select “Now”.
- (Optional) Add a second step: “Open page”, then select “New page added”. From here, you can add notes, to-dos, and other information about the session.
Want to take your time-tracking setup to the next level? You can refine your database to include relations to your tasks and projects databases, as well as a formula to show how many hours and minutes you spent on a task.
Related: Notion Time Tracking & Timesheets: How-to, Templates, and More
Reporting and Logging Bugs
Using Notion with a software development team? You can create a button to automatically create a new bug report in one click. Here’s how to set it up.
- Create a button.
- Set the first step to “Add page to”.
- Select your bugs database.
- Click the drop-down box on the left side to choose a property you’d like to update when you click the button. In the box next to the property, set your parameters. (For example, you might update the “Status” property to “Reported”.)
- (Optional) Click “Edit another property” to update any properties you’d like to appear when you click the button. (These might include reported by, date reported, etc.)
- Add a second step: “Open page”.
- Select “New page added”.
From here, whenever you report a new bug, you’ll automatically create a new bug report with relevant properties already updated. Setting the button to open the page you just created will easily let you input more details about the bug, recommendations, and other info.
Reassigning or Delegating Tasks
If you use Notion to work with a VA or subcontractor, you can set up a button to assign tasks to them in bulk. For this example, we’ll set up the button to reassign all tasks created today. Of course, you can change Step 4 below to fit your workflow — for example, if you have a “Priority” property that’s set to “Delegate”, you can use that for the filter instead. Here’s how to set it up:
- Create a button and give it a name, like “Delegate all tasks created today”.
- Set the first step to “Edit pages in”.
- Select your tasks database.
- Next to “Pages to edit”, click the drop-down arrow to create a filter for “Created time” is “Today”.
- Click “Edit a property”.
- Edit any properties you’d like to appear on the edited page. These might include assignee, status, priority, etc.
To make this process even faster, you could create another button that lets you add new tasks in one click. (Scroll back up to the “Capturing New Tasks” use case above for a walkthrough!)
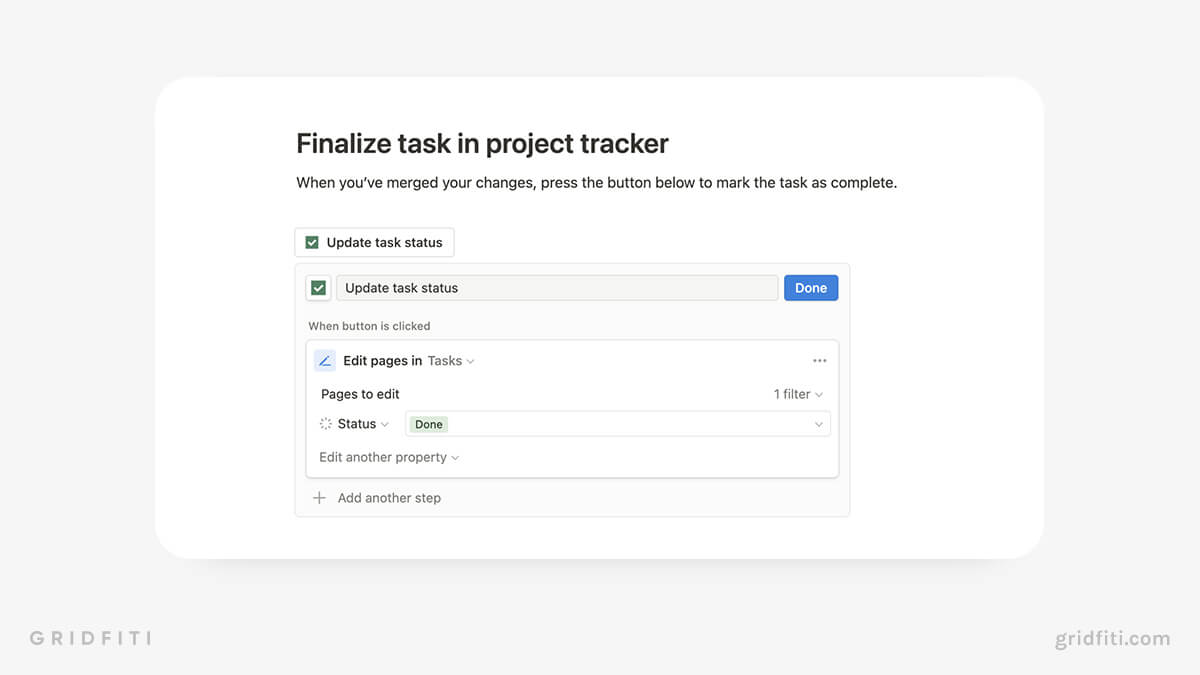
Changing the Status of Several Tasks in Bulk
Using Notion for task management? With buttons, you can change the status of several tasks in one click.
For this example, we’ll set up the button to change the status of tasks due today to “Complete”. Here’s how to do it.
- Create a button and give it a name, like “Complete all tasks due today”.
- Set the first step to “Edit pages in”.
- Select your task database.
- Next to “Pages to edit”, click the drop-down arrow to create a filter where “Due” is “Today”.
- Click “Edit a property”.
- Select your Status or Checkbox property (or whichever property you use to indicate a task is complete).
- Set your filter to where “Status” is “Complete” or where the box is checked.
With this button, you’ll be able to check off all items on your to-do list with just one click — super convenient!
Submitting Items for Approval
If you’re using Notion for work along with your teammates, clients, or stakeholders, Notion’s buttons will definitely be a gamechanger.
For this example, we’ll pretend that we’re using Notion to submit a social media post to the marketing team for final approval. We’ll use a “Created time” property to ensure only recently created posts get submitted for approval. Of course, you can use a different property, like a Status property, to achieve the same thing. Here’s how to do it:
- Create a button.
- Set the first step to “Edit pages in”.
- Select your content database.
- Next to “Pages to edit”, click the drop-down arrow to create a filter where “Created” is “today” (or this week, or whatever parameters make the most sense for your workflow).
- Click “Edit a property”. From here, you may want to update 2 properties: One for the assignee, and one for the status. For example, you may want to add the person who will be approving the post in the Assignee field and update the status to “Awaiting final approval”.
- (Optional) Create a second step to show a confirmation box before submitting. This will prompt you to ensure you’ve completed all items on the content production checklist before continuing.
That’s it for our tutorial on Notion buttons and use cases. How are you using buttons in Notion? Drop a comment and let us know — we’d love to hear how this nifty feature is improving your workflow!
Gridfiti is supported by its audience – when you buy something using the retail links in our posts, we may earn a small commission at no additional cost to you. Read more about our affiliate disclaimer.